My latest H0 wagon - LNER/BR 13t steel high, scratchbuilt body on a Lima chassis.
Brake gear and paint still to complete, will get more photos to you once its finished.
Brake gear and paint still to complete, will get more photos to you once its finished.
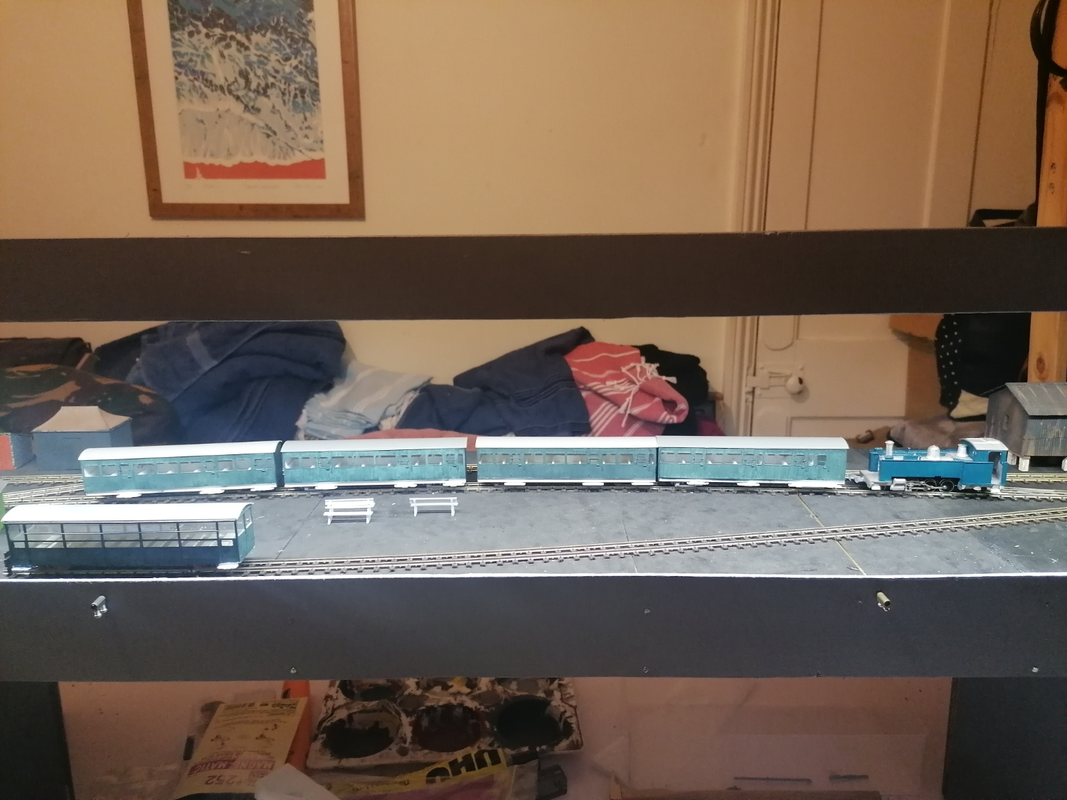
Having avoided Welsh narrow-gauge for 45 years of my modelling 'life' I've finally succumbed, lured in by a postcard of Devil's Bridge in the 1970s. Showing 3 trains, each with a BR blue steam loco on a rake of coaches.
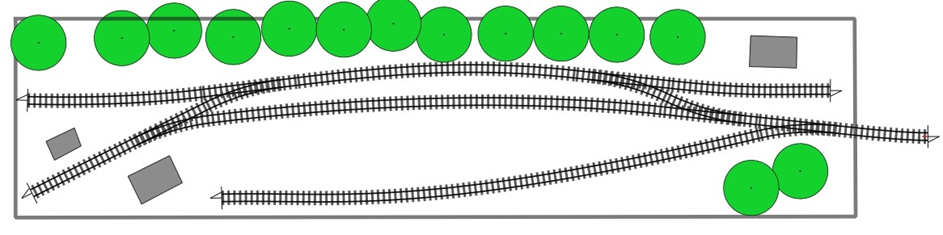
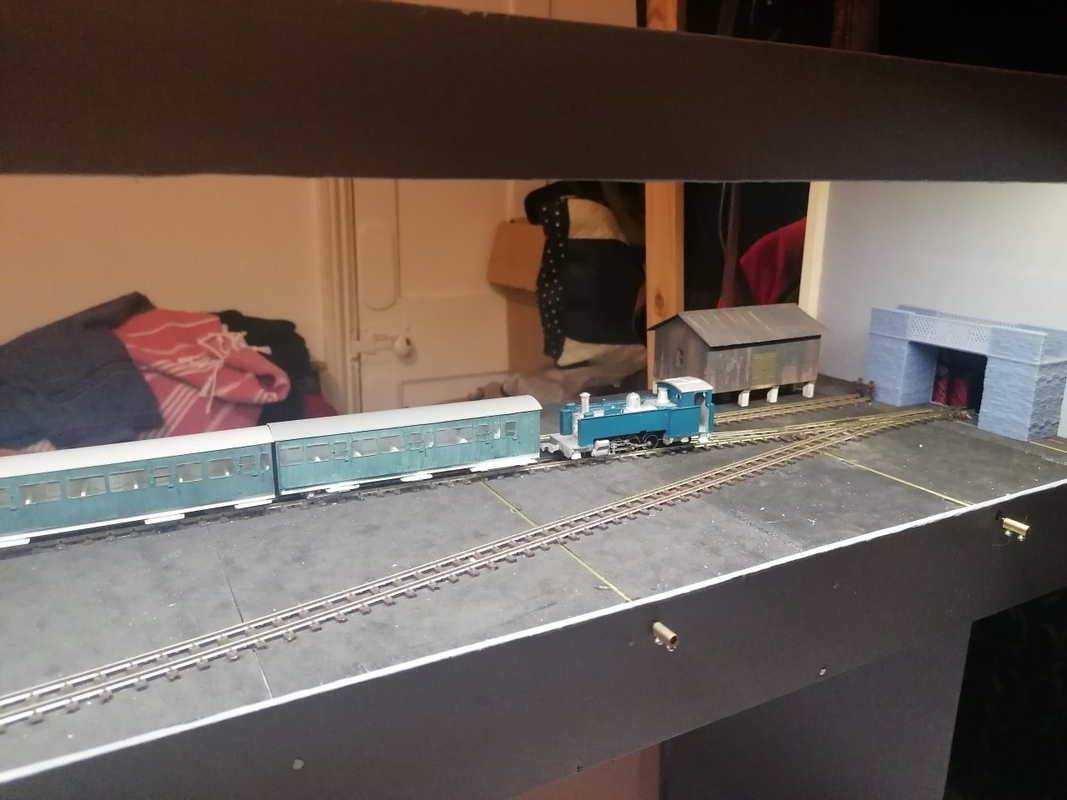
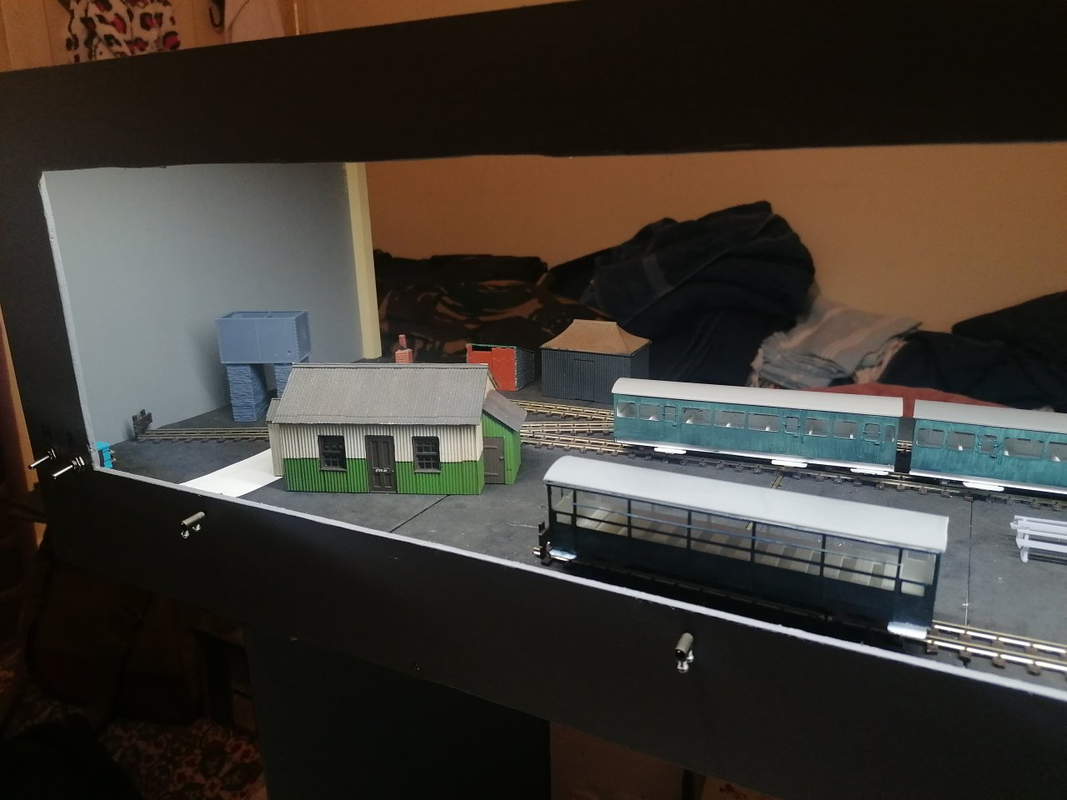
And so Mynydd y Ddraig (Dragon Mountain) was born. Set on yet another Ikea Lack 110cm shelf, this will be my layout build over the winter. Peco 009 track and other bits were delivered by Santa a couple of years ago and I've laid it out a few times to refine the plan - it's essentially Devil's Bridge, compressed to take 4 coaches in the 2 platform roads, with sidings off either end of the loop to add a bit of p-way variety.
And so Mynydd y Ddraig (Dragon Mountain) was born. Set on yet another Ikea Lack 110cm shelf, this will be my layout build over the winter. Peco 009 track and other bits were delivered by Santa a couple of years ago and I've laid it out a few times to refine the plan - it's essentially Devil's Bridge, compressed to take 4 coaches in the 2 platform roads, with sidings off either end of the loop to add a bit of p-way variety.
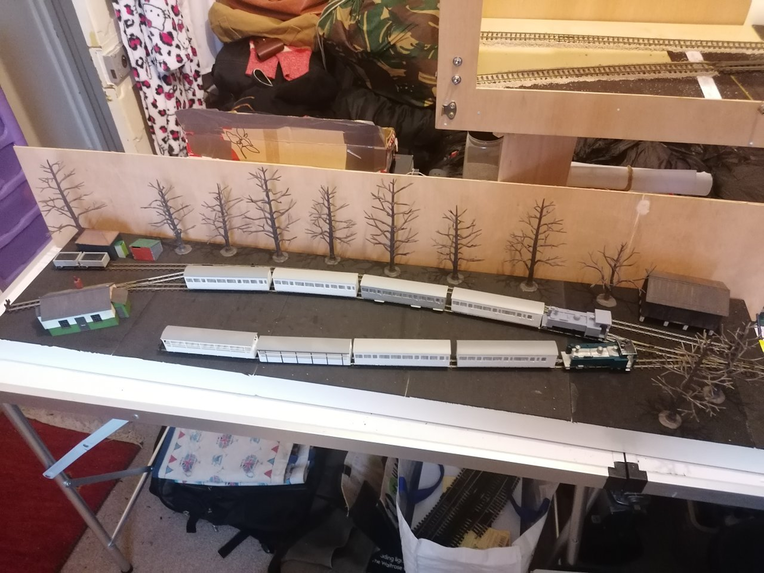
Trackwork is all Peco 009, point control via wire-in-tube and electrics have been kept simple, with 4 isolating sections and the rest all electrically live. Control will be analogue dc.
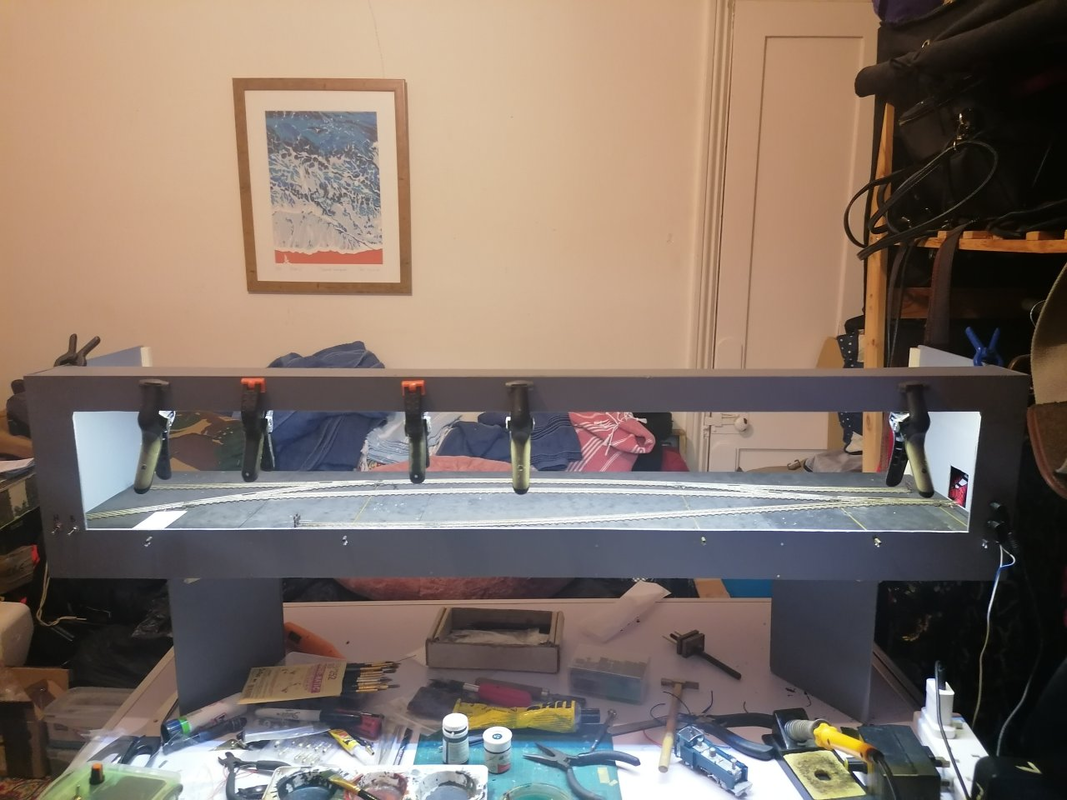
A simple ply display box surround, incorporating LED lighting strips
A pair of the 2-6-2T locos are under build, a Chivers white-metal body on a Minitrix Ivatt tank chassis, the other a 3D printed body on a modified Farish 08 shunter chassis.
The coaching stock is all scratchbuilt bodies, with sides drawn up and cut in plasticard on my Silhouette cutter, riding on Dundas bogies. Assorted P-way wagonry from various kit sources rounds out the fleet.
I did trial some 3D-printed Chopper couplings, but reliability wasn't great, so I've swapped to DG etched couplings.
Locos and coaches will be finished in the early, unlined rail blue seen on the prototype between 1968 and 1975.
Structures are modified Wills, scratchbuilt and 3D-printed items, plus a number of Woodlands Scenic trees.
I have a local show deadline of mid-Feb 2024 (Kenavon exhibition) and I definitely want to get this project done and dusted before the RTR locos and stock come out and make VoR modelling too easy!
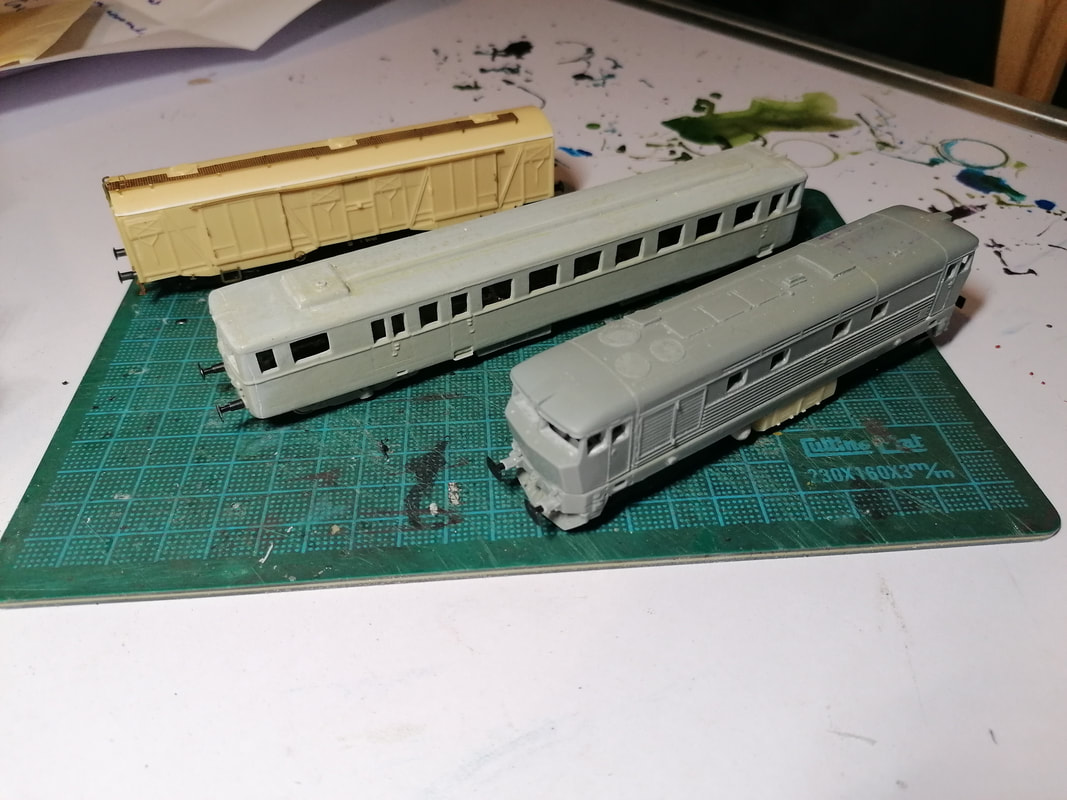
DOUNREAY - HO
H0 Scale Class 24/1s
3D resin printed body shells/bogies/tanks from Lincoln Locos with both chassis bodged from a Roco DB V90 heavy shunter, each of the 24s have 1 drive bogie from the V90, the trailing bogies are scratchbuilt. One in green and one in blue, H0 decals from RailTec.
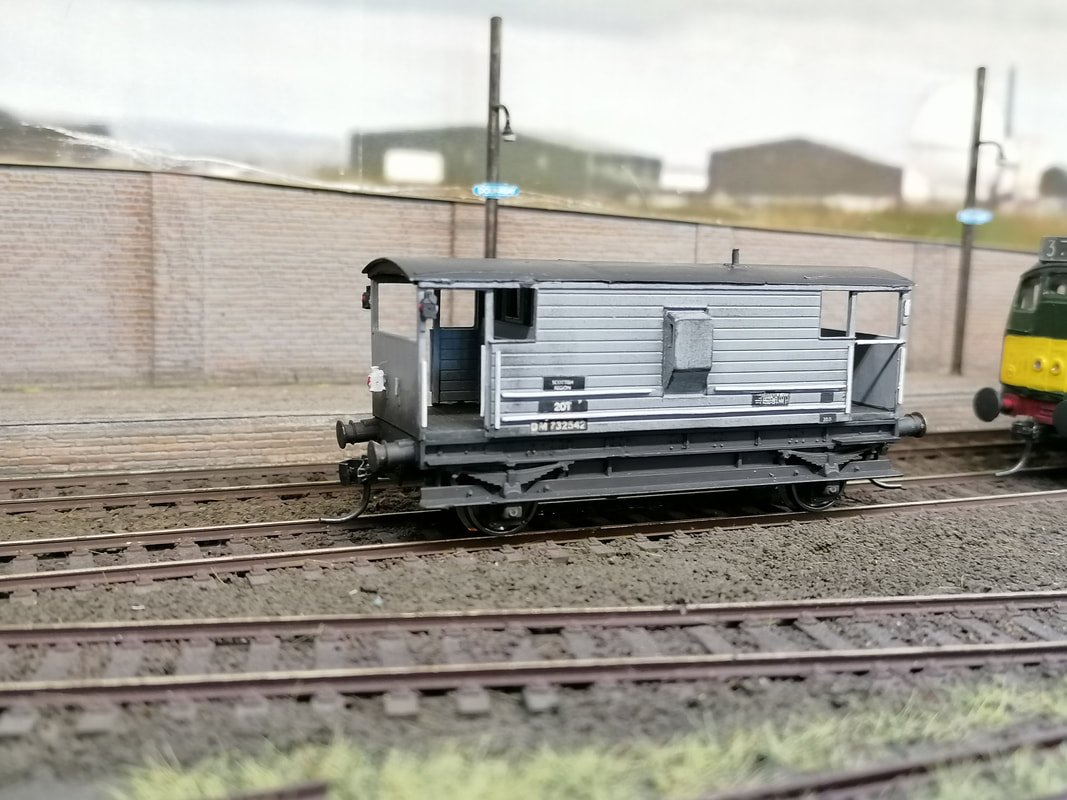
H0 scale LMS 20t Brakevan, scratchbuilt body on a Lima RTR chassis.
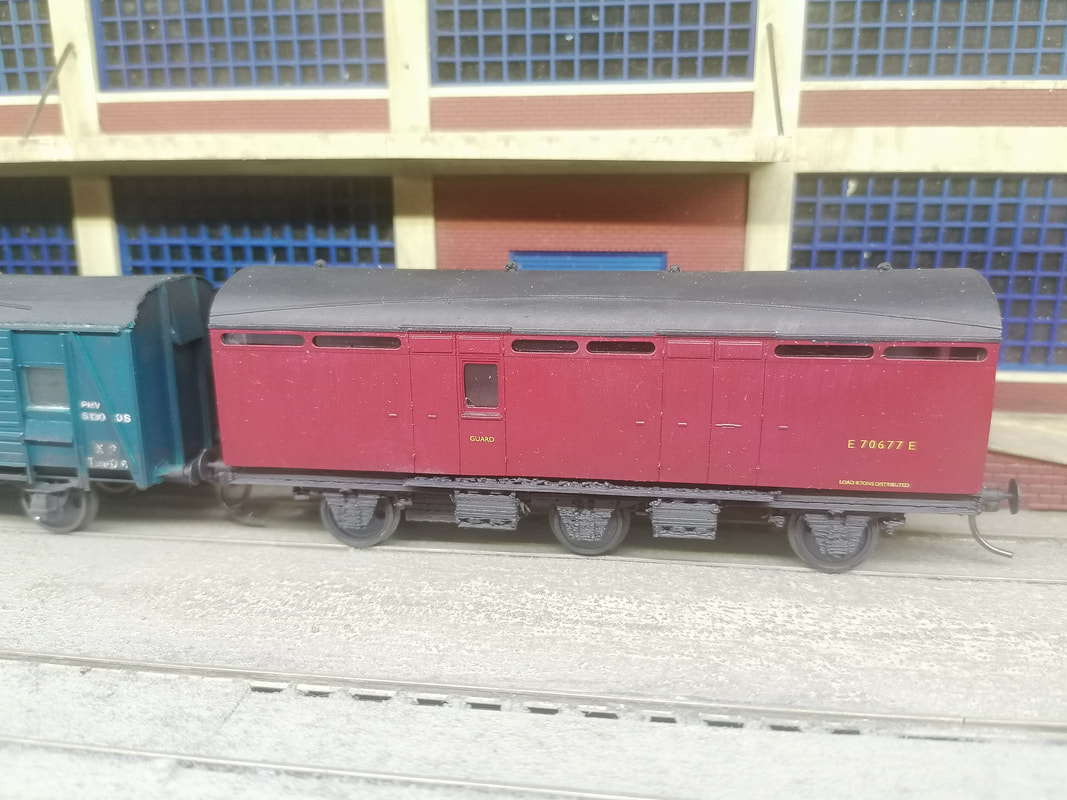
H0 scale Thompson BZ 6-wheel parcel van, another 3D print, finished in maroon, decals from RailTec
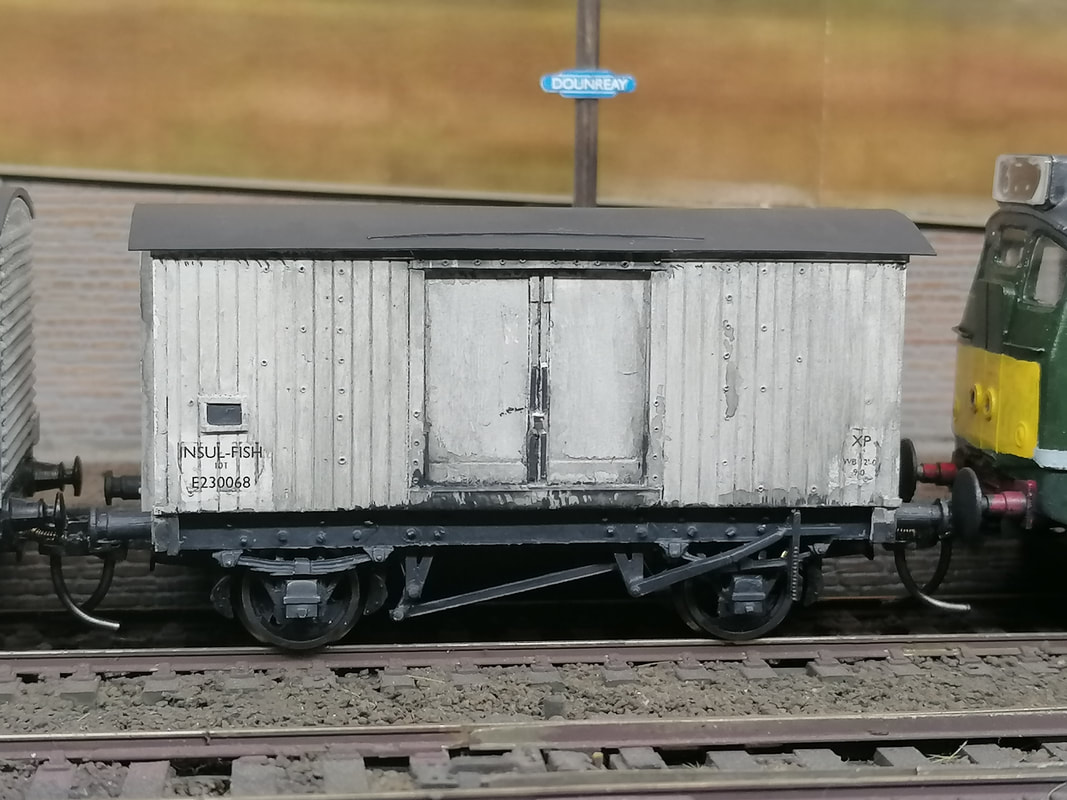
Scratchbuilt H0 scale LNER diagram 134a Fish Van (Insulated conversion) all done in plasticard
3D resin printed body shells/bogies/tanks from Lincoln Locos with both chassis bodged from a Roco DB V90 heavy shunter, each of the 24s have 1 drive bogie from the V90, the trailing bogies are scratchbuilt. One in green and one in blue, H0 decals from RailTec.
H0 scale LMS 20t Brakevan, scratchbuilt body on a Lima RTR chassis.
H0 scale Thompson BZ 6-wheel parcel van, another 3D print, finished in maroon, decals from RailTec
Scratchbuilt H0 scale LNER diagram 134a Fish Van (Insulated conversion) all done in plasticard

Nove Mesto TT Scale
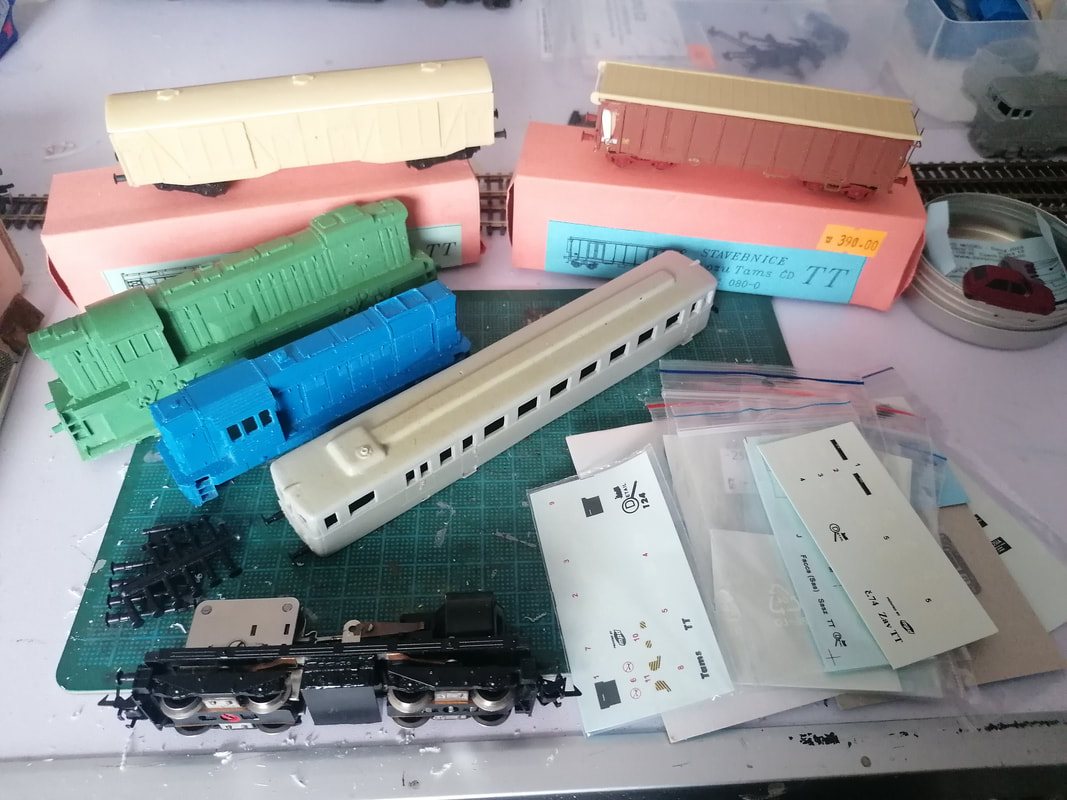
And some Czech TT models - I was gifted a box of older models, including some cast resin bodyshells and kits, plus decals and detailing bits n bobs.
I've brought some to the 'awaiting paint' stage, from front to back:
Class 749 'Grumpy' diesel loco
Class 830 Diesel railcar
Gags type bogie van, resin shell with etched details.
Aiming to get these complete before Nove Mesto's next outing.
I've brought some to the 'awaiting paint' stage, from front to back:
Class 749 'Grumpy' diesel loco
Class 830 Diesel railcar
Gags type bogie van, resin shell with etched details.
Aiming to get these complete before Nove Mesto's next outing.
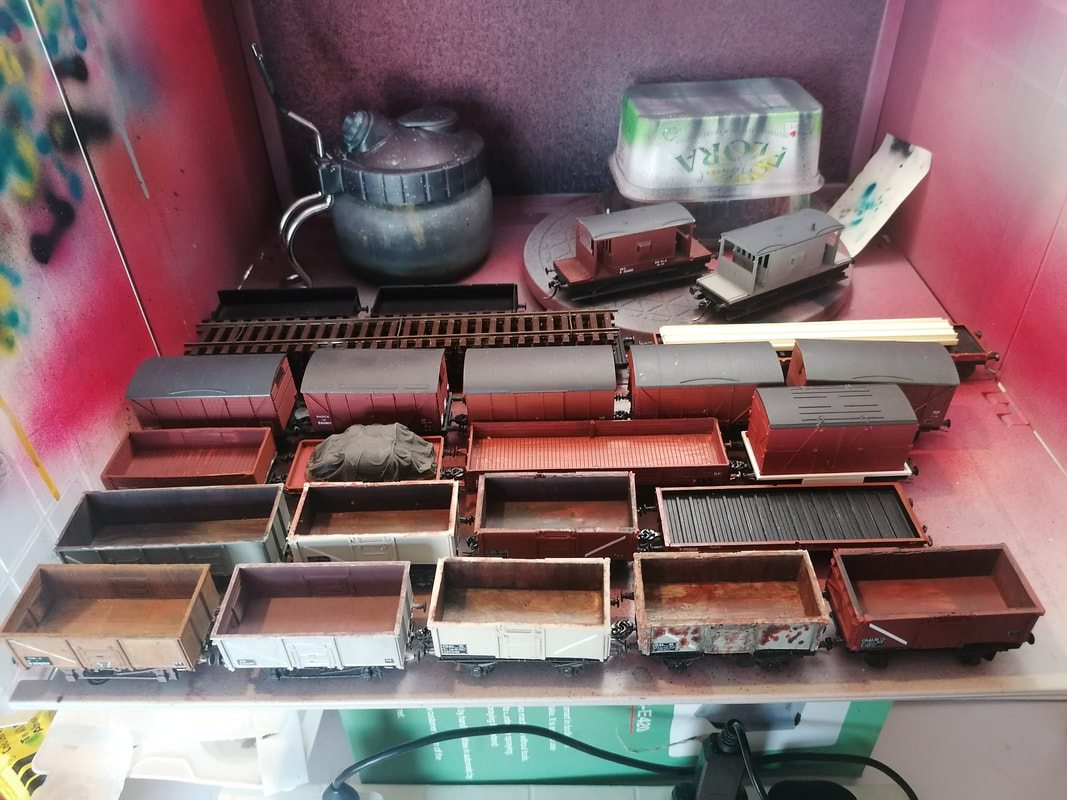
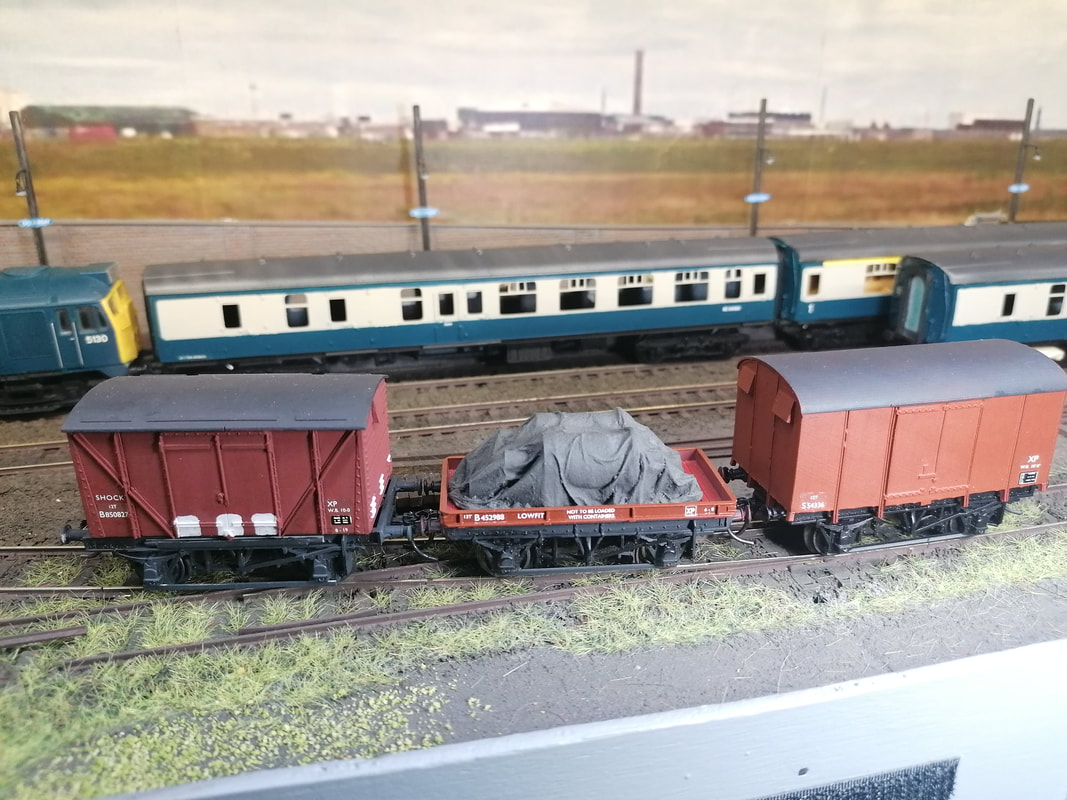
Dounreay Rolling Stock. HO
|
|
With a show deadline fast looming, I've been finishing off a slew of H0 stock for my Scottish micro, Dounreay.
Lima H0 Mk1 coaches have been re-skinned with new plasticard sides cut on my Silhouette cutter and correct length bogies using my own cast resin sideframes.
A pair of ex-SR PMVs are scratchbuilt in plasticard and microstrip, while an asosrtment of freight stock includes re-worked Lima rtr, 3D printed wagons as well as scratchbuilt or 3D bodies on Lima or Jouef underframes, plus a couple of entire scratchbuilds.
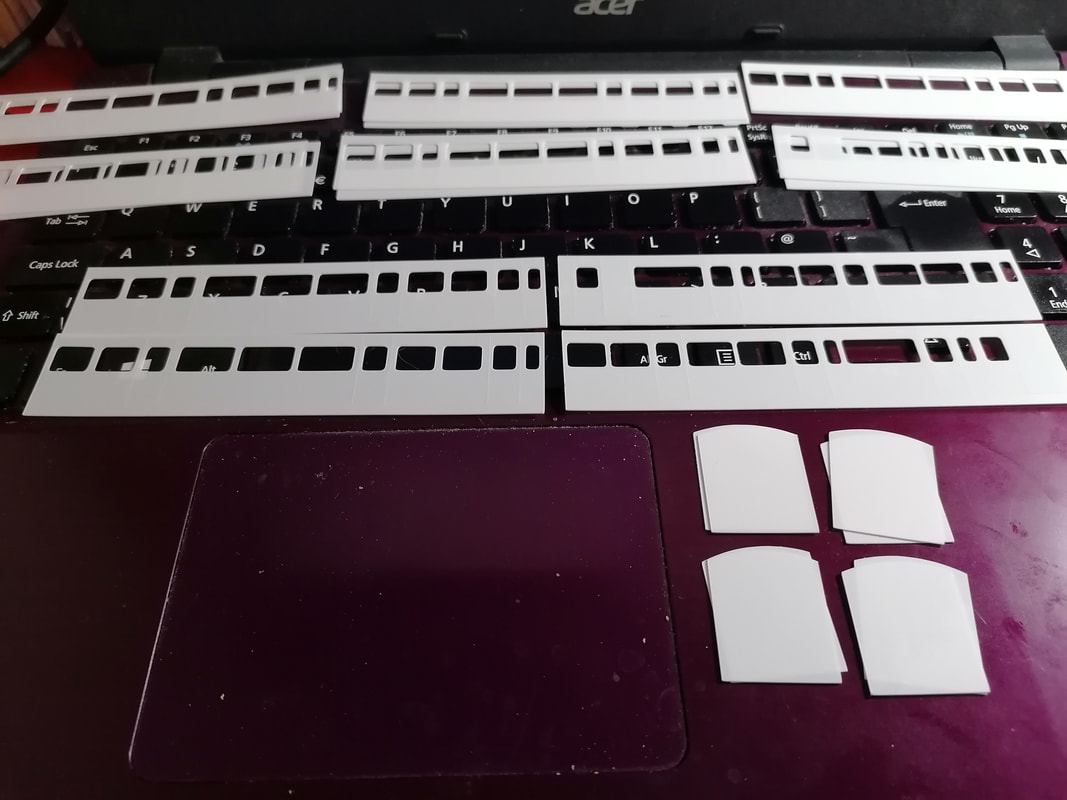
Vale of Rheidol Coaches. 009 scale
I've been experimenting with cutting coach sides for the 1938 built stock on the Vale of Rheidol railway for my 009 micro layout project.
Drafted up the sides, end and separate droplights for both the covered third and covered brake third coaches, Scaling from the BR weight diagrams and cross-referenced against photos.
Each side comprises 2 layers of 10 thou plasticard laminated together, assembled with the ends around a 60 thou floor. Evergreen 3.2mm channel section for the solebars and Dundas VoR bogies.
Seats, steps and other details still to be fitted to the test build, then primer, a few coats of BR blue and glazing, plus a Dundas roof to complete.
Then the other 5 thirds and 2 brakes to build, plus the 'open' coaches and brake van I'm drawing up at the moment!

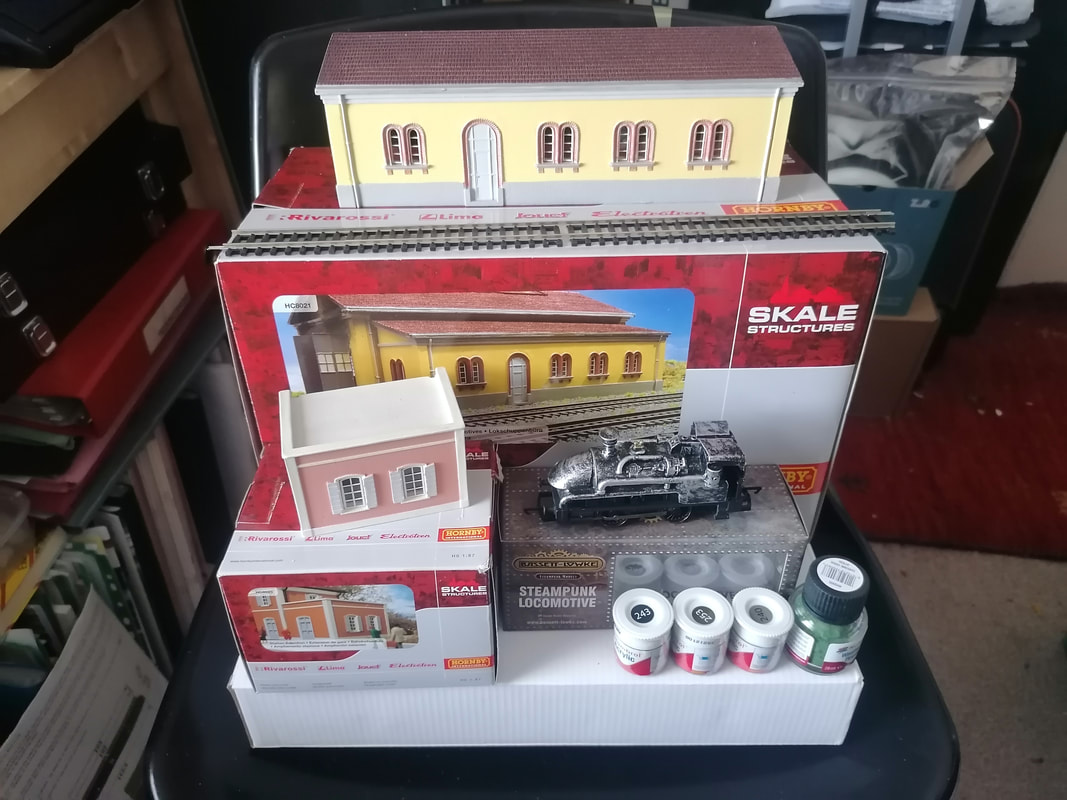
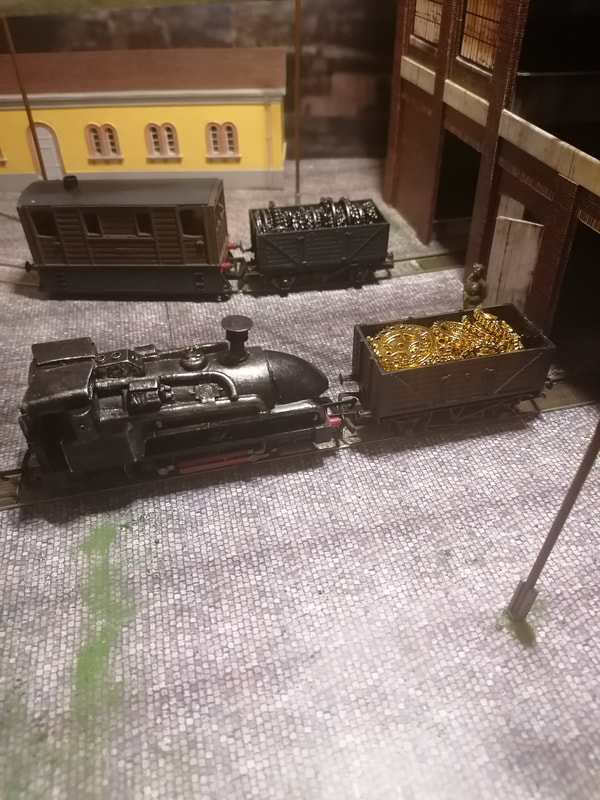
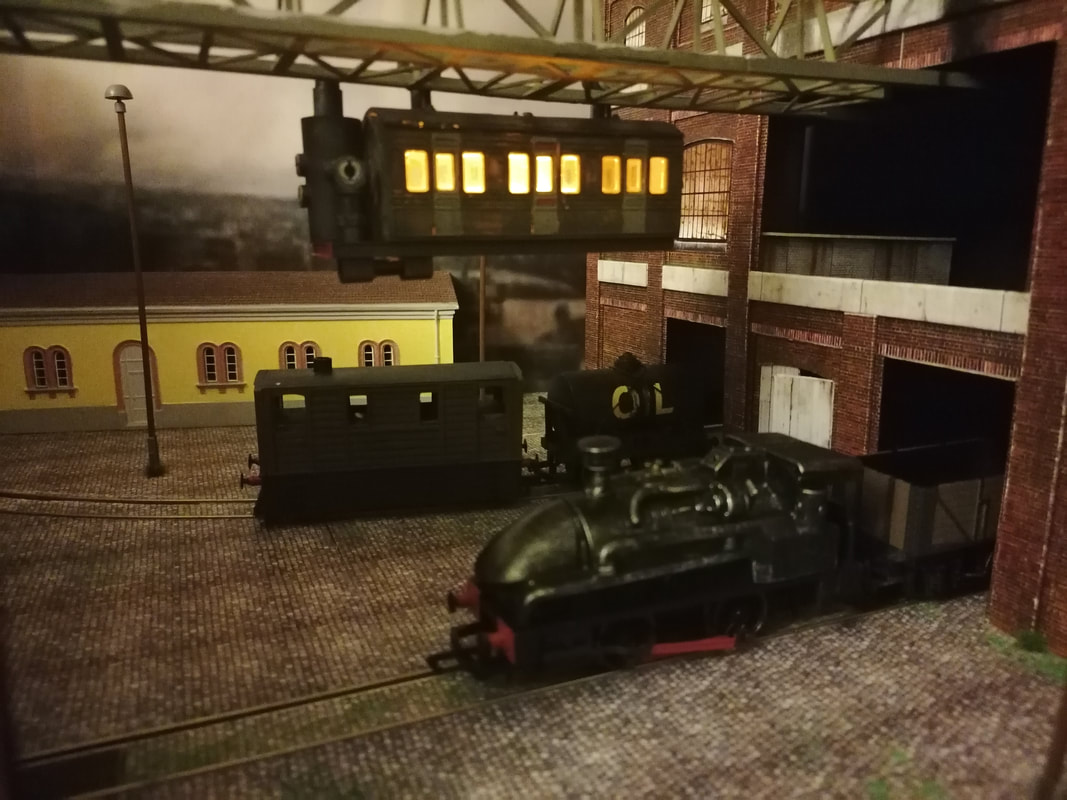
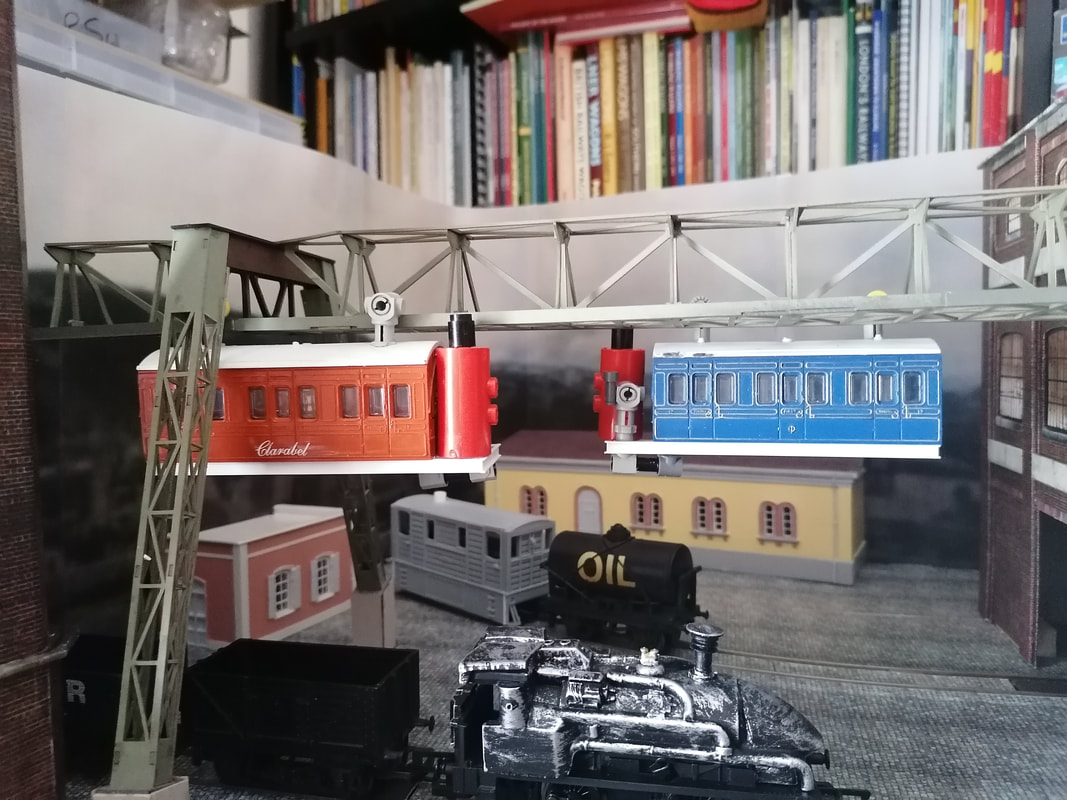
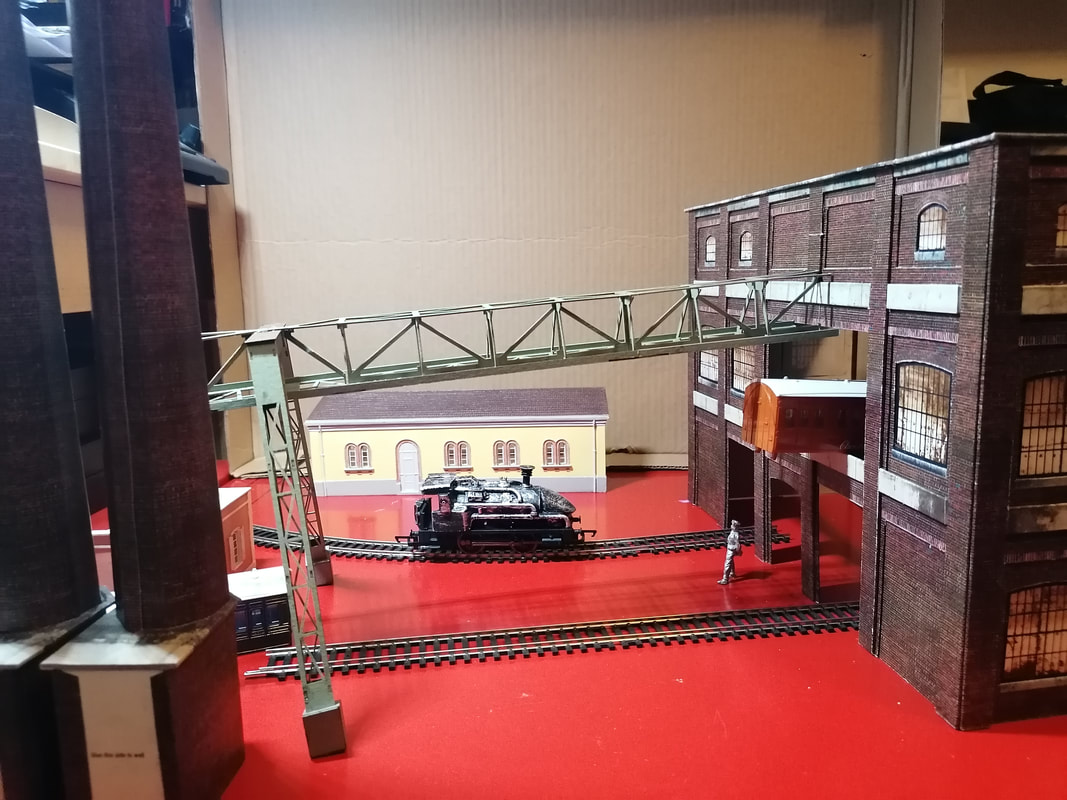
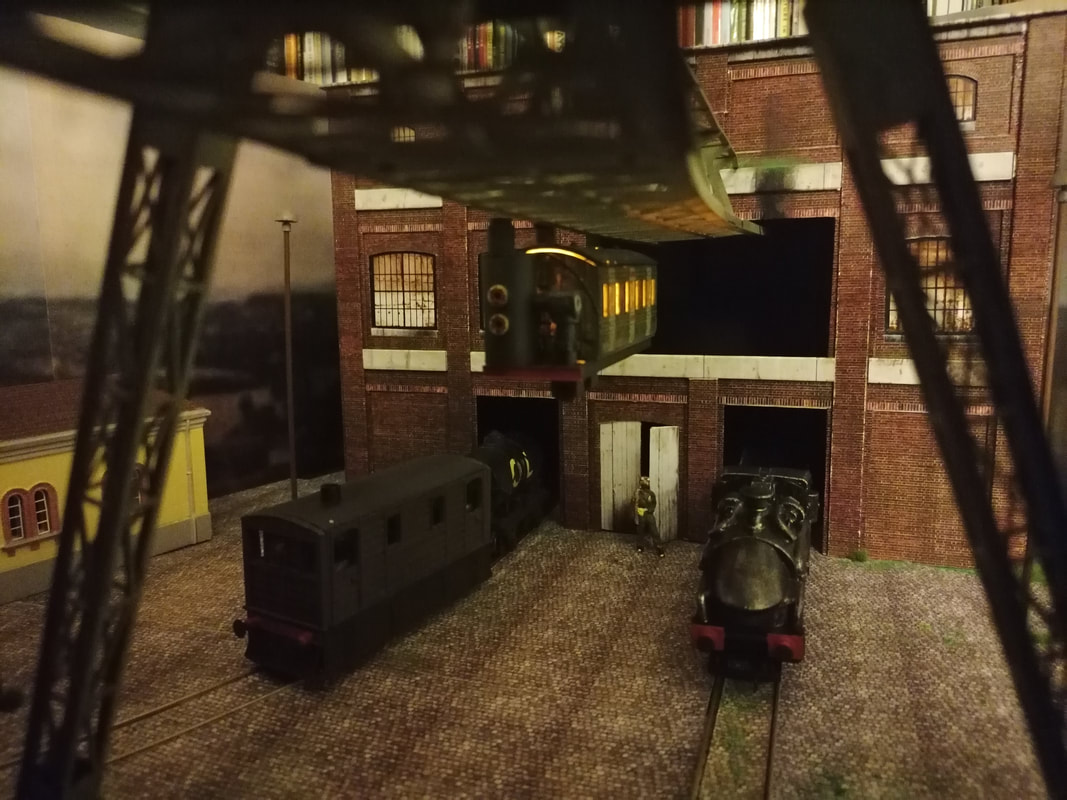
Steampunk Silliness.
Through Steampaper and Bassett-Lowke, I've made a diorama for the 'SteampunkIt21' competition.
Hornby/Basset-Lowked supplied a bundle of items from their steampunk range (loco, couple of resin buidings and paints) to make a diorama 50cm x 50cm.
I added a Scalescenes warehouse card kit, a Wuppertal Schwebebahn overhead railway portal and track section from a Joswood.de laser-cut kit, home-printed cobbles and backscene. The 'danglewagen' on the overhead railway are modified Hornby 4-wheelers and the tram oco is a Budget model Railways 3D body kit on a Hornby 0-4-0 chassis.


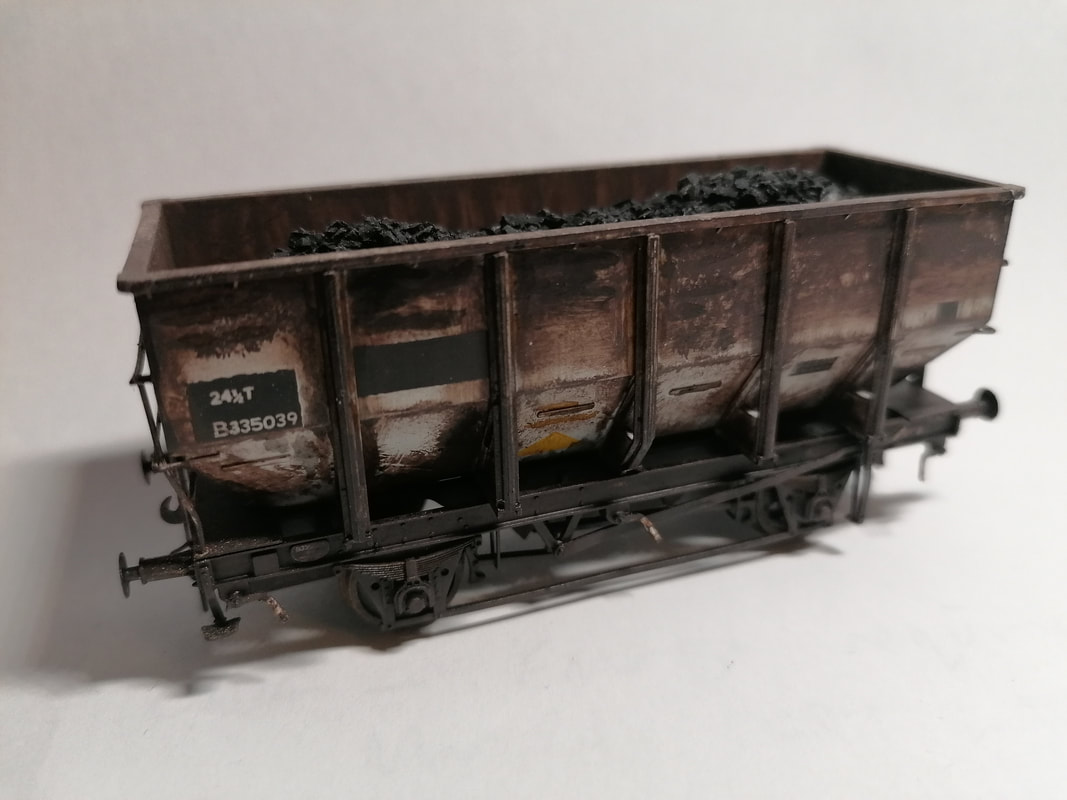
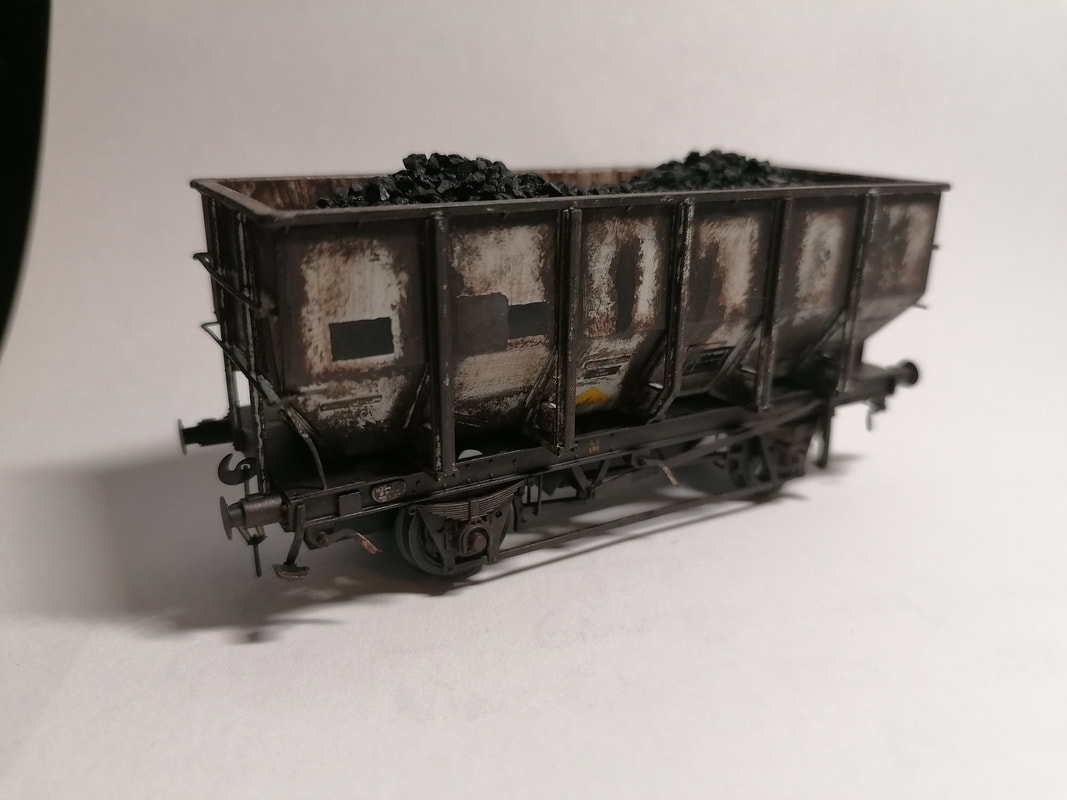
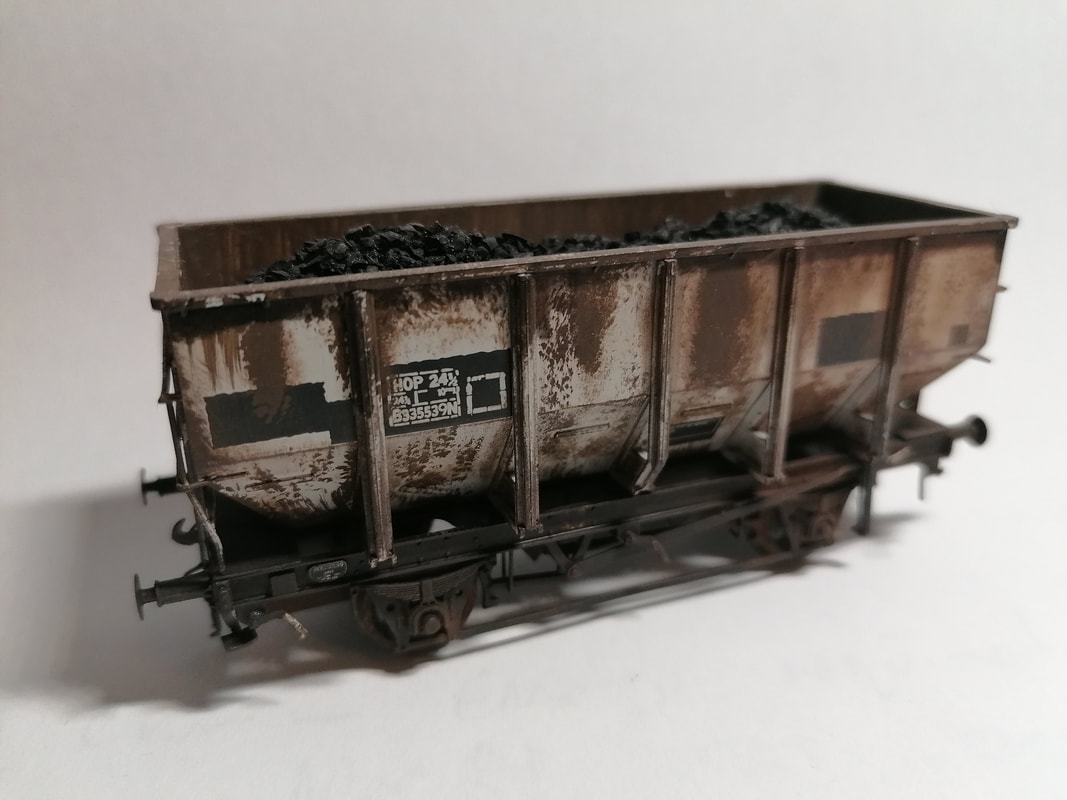
Accurascale 24 1/2 ton hoppers, TOPS code HUO. 4mm/EM Gauge.
Weathered using Humbrol enamels and Vallejo acrylics, referencing the excellent Paul Bartlett wagon photo website.
A further 3 are in progress, using artists oils and Vallejo pigments as a trial.
A further 3 are in progress, using artists oils and Vallejo pigments as a trial.

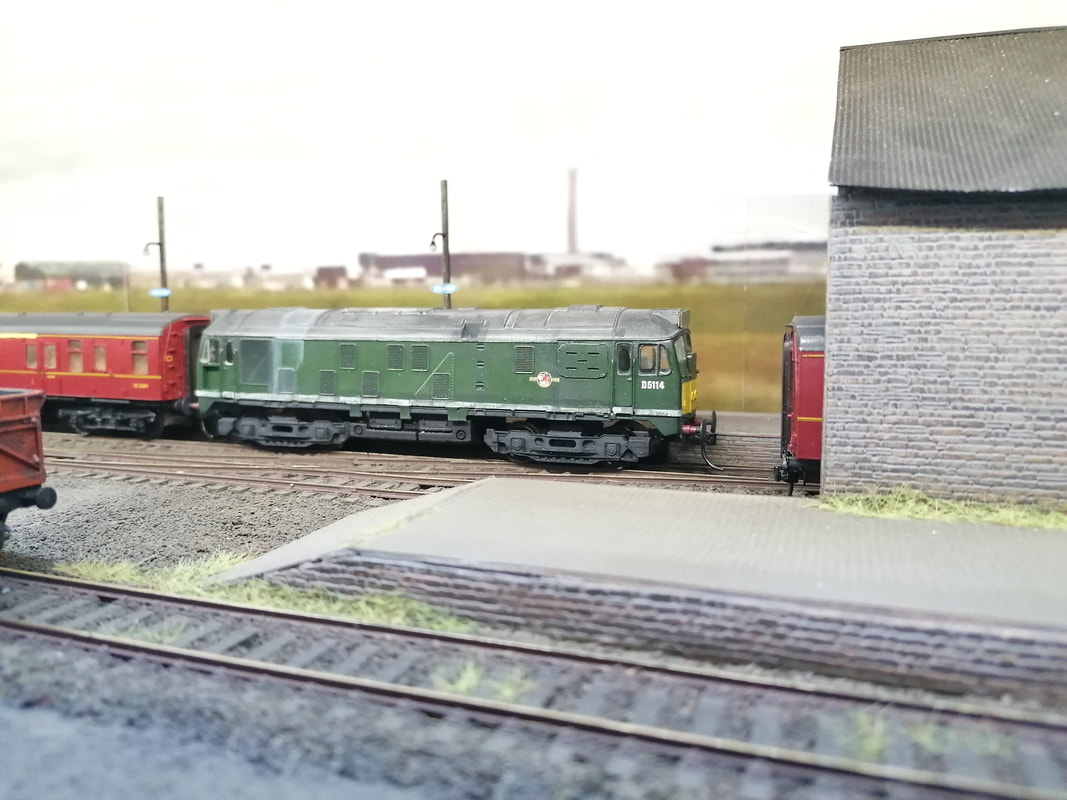
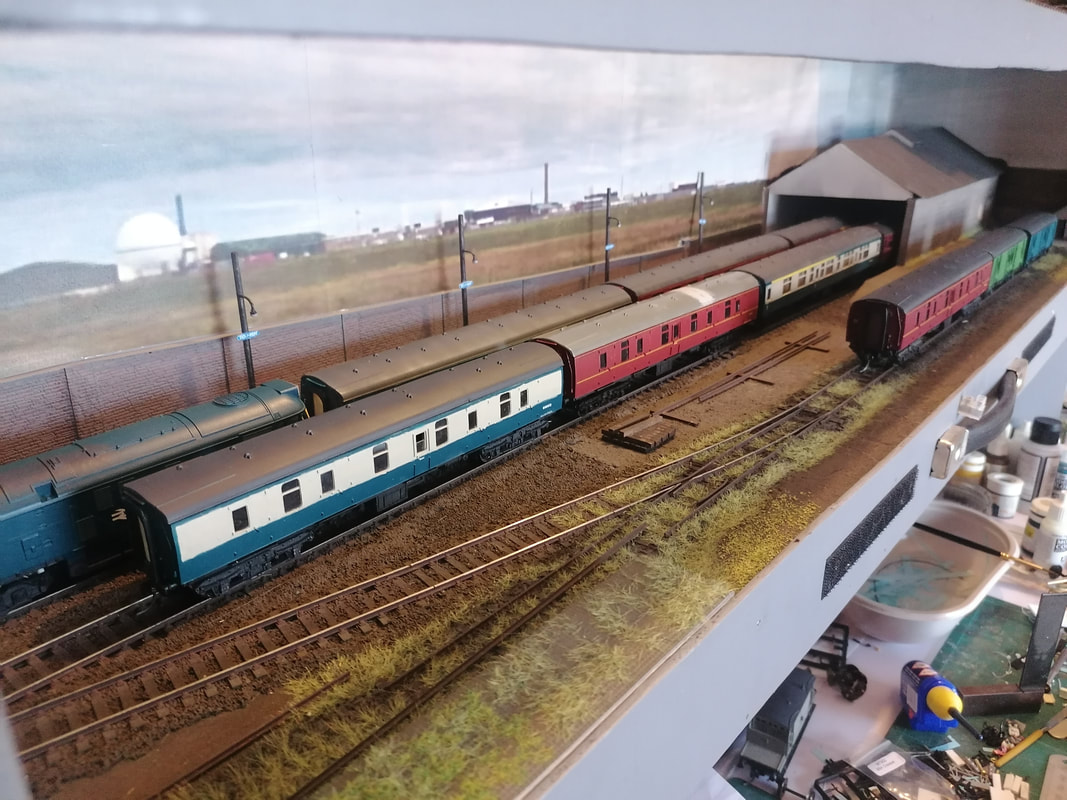
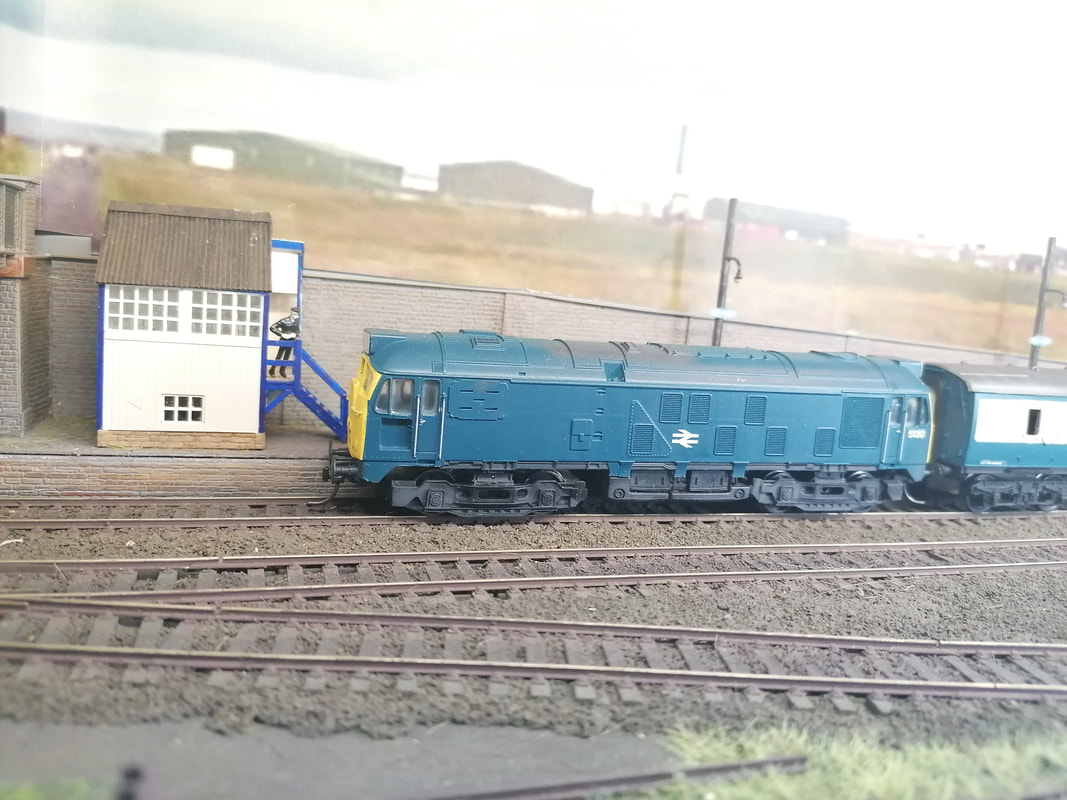
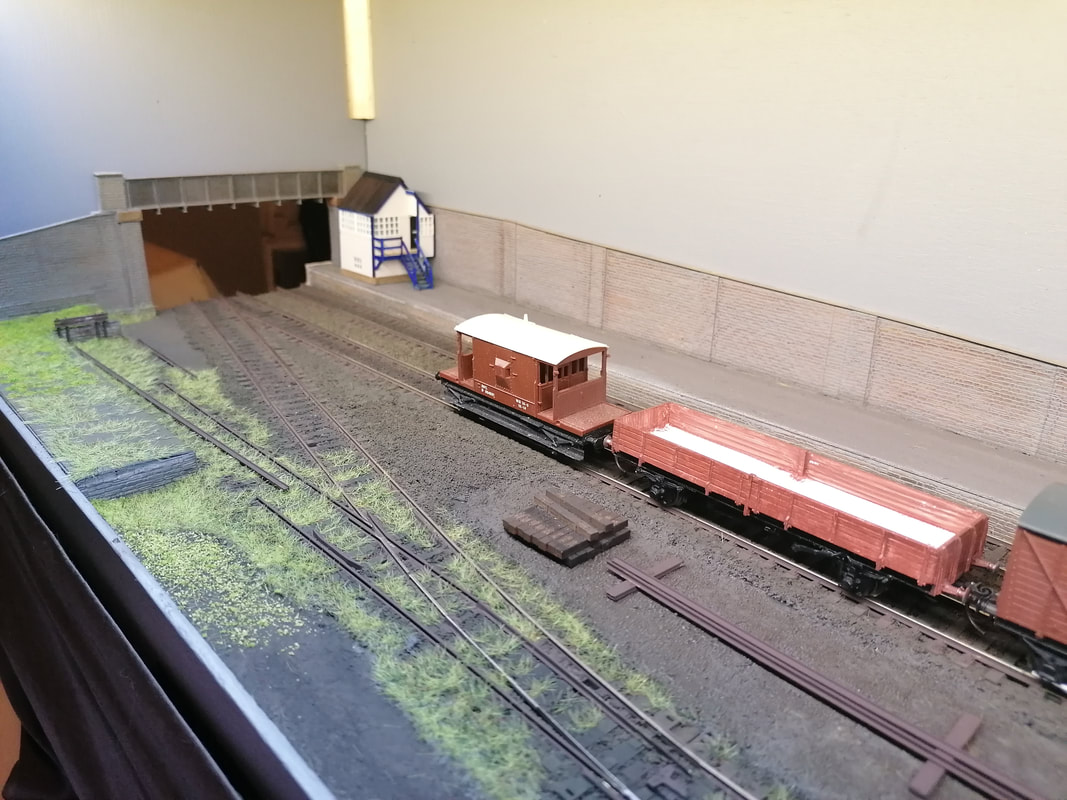
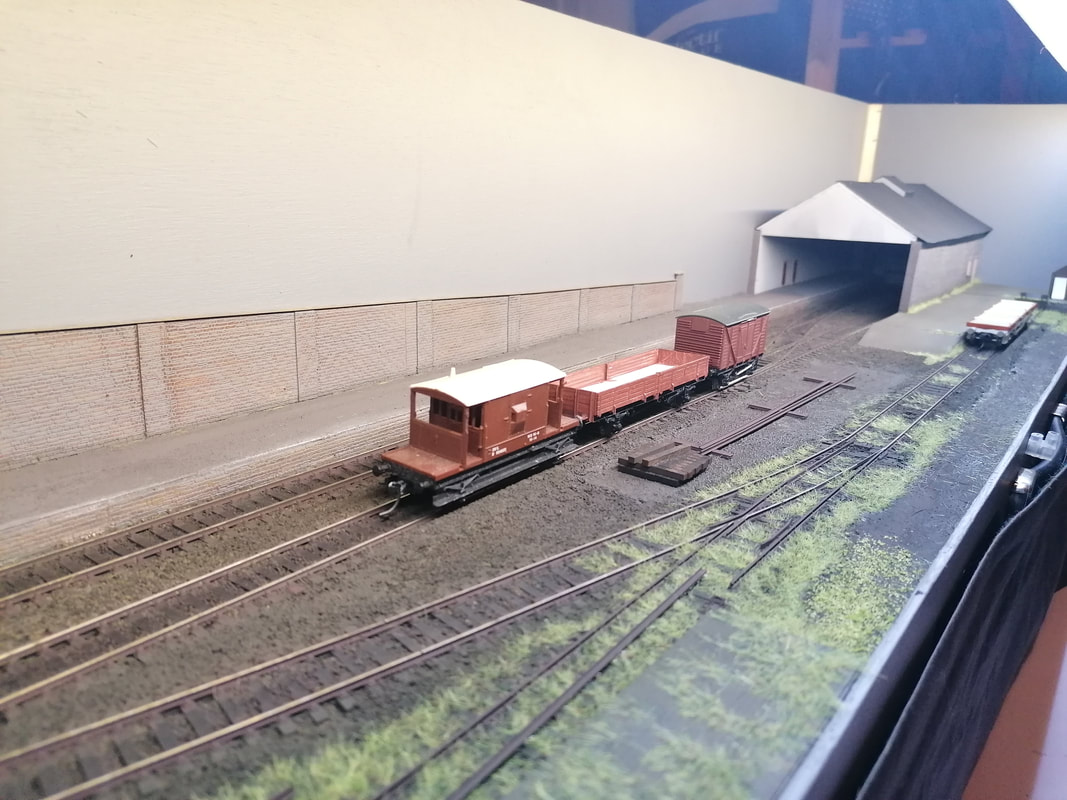
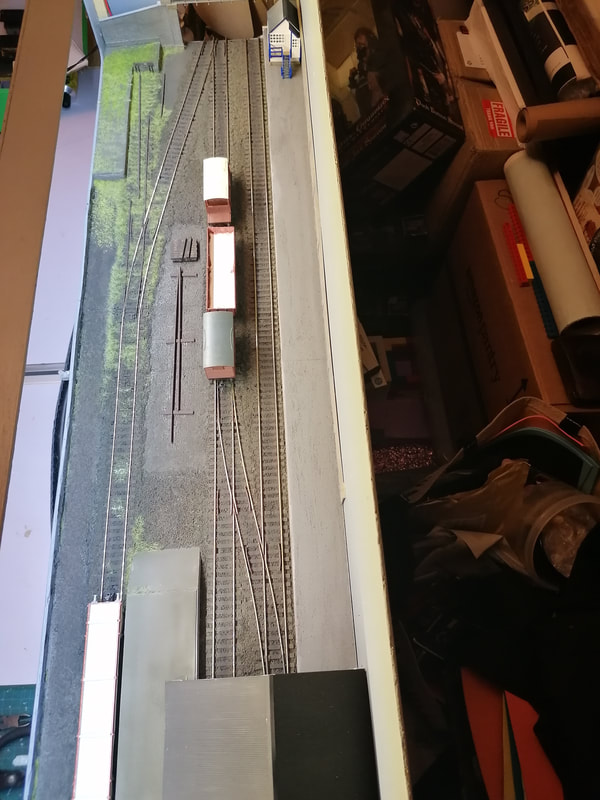
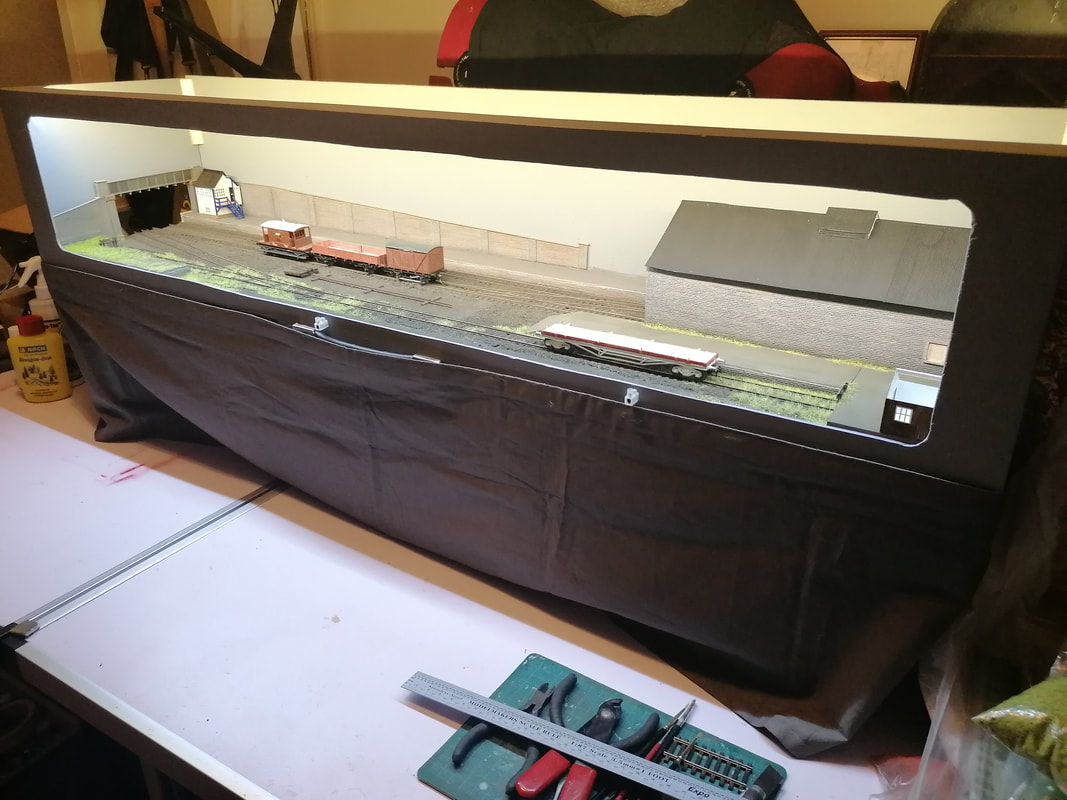
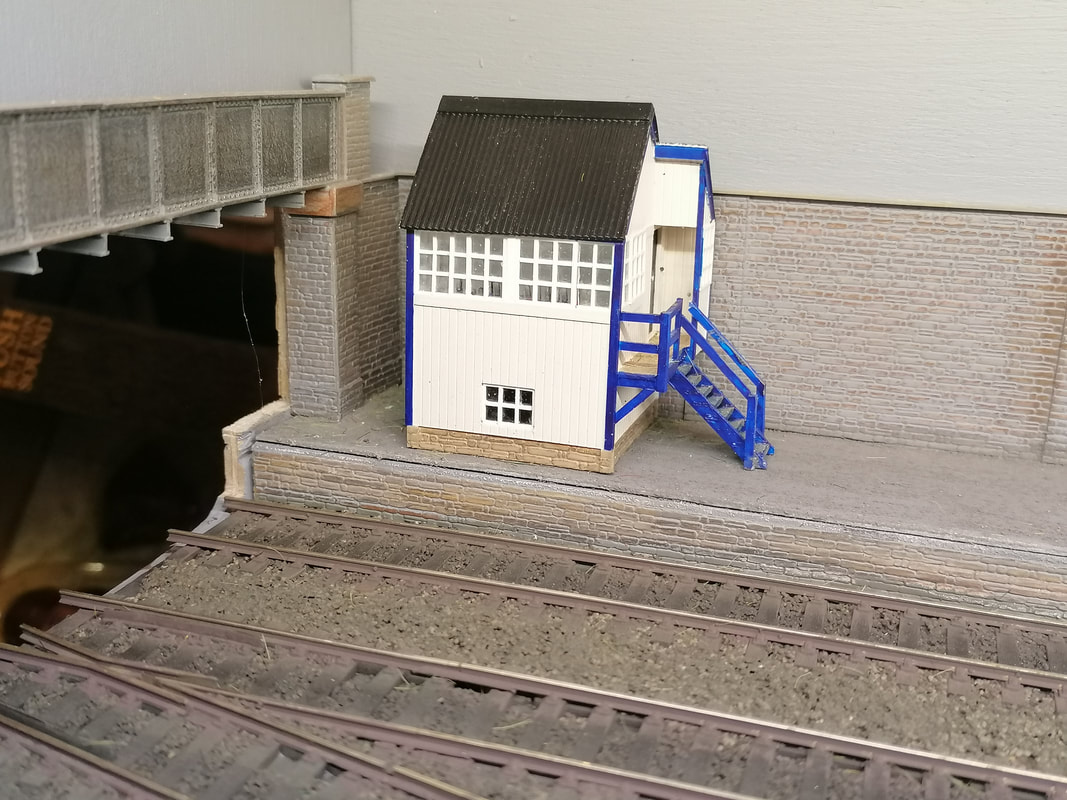
Dounreay (late 60s - 70s era) HO scale.
The latest in my series of layouts based on the Ikea Lack 110cm shelf as a baseboard, Dounreay is a fictional (though plausible) branch terminus in the Far North of Scotland and set around 1970. The typical short overall roof is largely based on the one at Wick, as are the low platforms.
A limited passenger service runs 3-times a day, 2 or 3 coaches hauled by a Type 2 loco of Derby or Birmingham build (Class 24 or 26), along with a daily freight comprising coal, general goods and the occasional structural steel load or parts for the nearby nuclear installation.
The layout is built to H0 scale (3.5mm:ft) rather than the usual 4mm:ft of OO scale, mainly for the modelling challenge. Adapting the 40-year old limited range of Lima H0 British locos and stock is very much the 'old school' modelling of my youth, which I'm enjoying immensely.
Track is Peco Code 75 (which, being H0, is correct gauge and appearance), with the structures mostly from Slaters embossed stone sheet, simply shaded with colour pencils.
The layout is still a work-in-progress, having been started in late-2019. I'm now at the scenics stage and I'm aiming to have it complete by the time exhibitions resume.
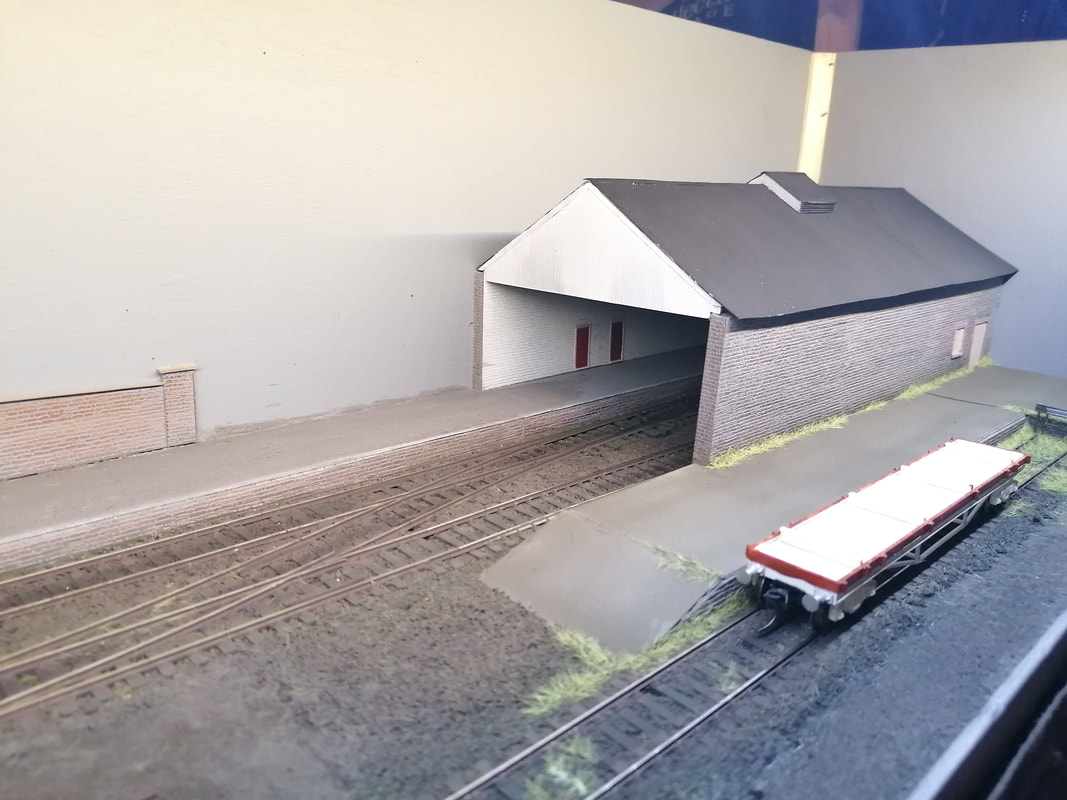
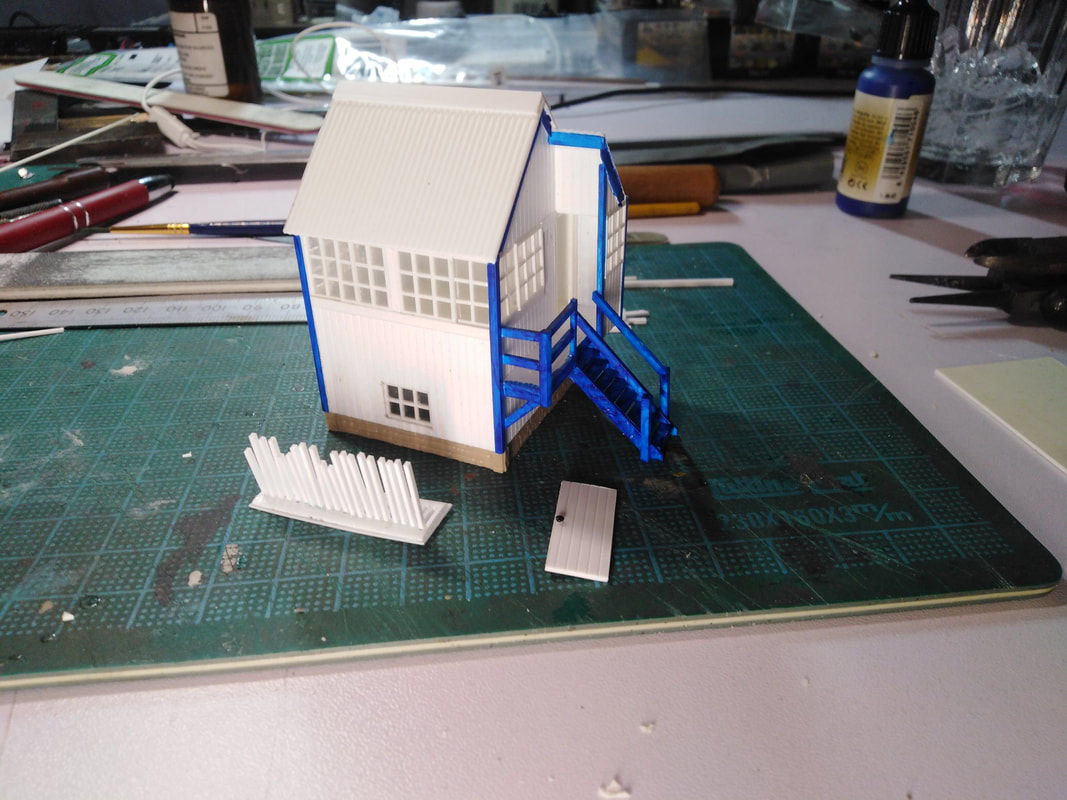
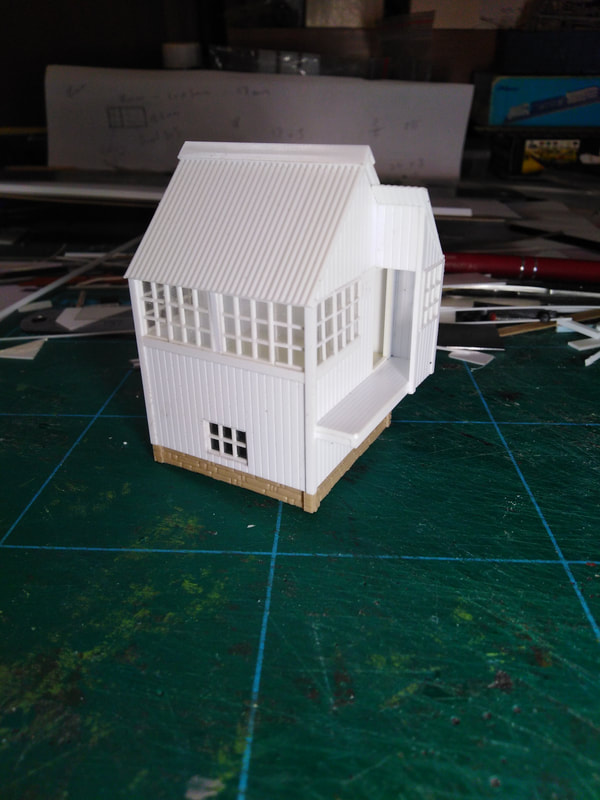
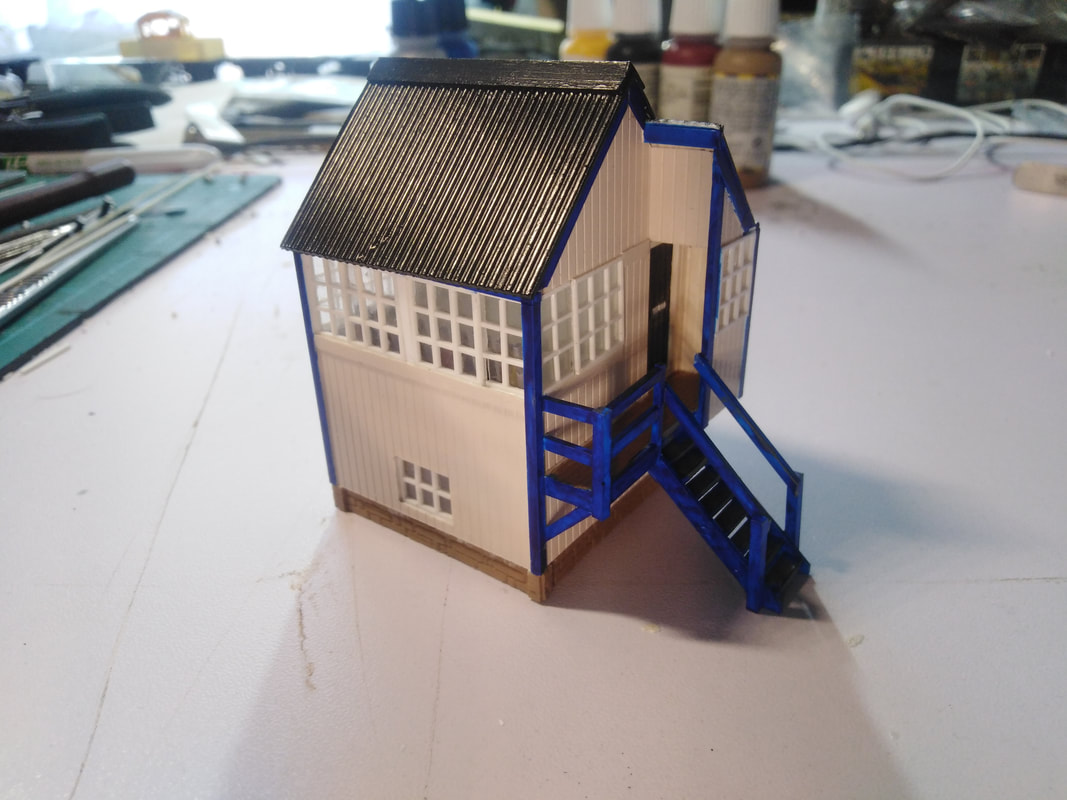
An Highland Railway signal box for Dounreay (late- 60s early - 70s era) in HO scale
Scratch built using Evergreen car siding and micro strip. Evergreen 'Car Siding' is milled plasticard sheet with, in this case, planks. It's available in various thicknesses of sheet and with a variety of plank widths. The signal cabin uses an O Gauge 'Passenger car siding' sheet with 3" planking, which works out at 6" wide planks for H0. It's also available corrugated, clapboard, setts, etc. 'Car Siding' is a US term, usually referring to the vertical planking on wooden passenger and freight cars.

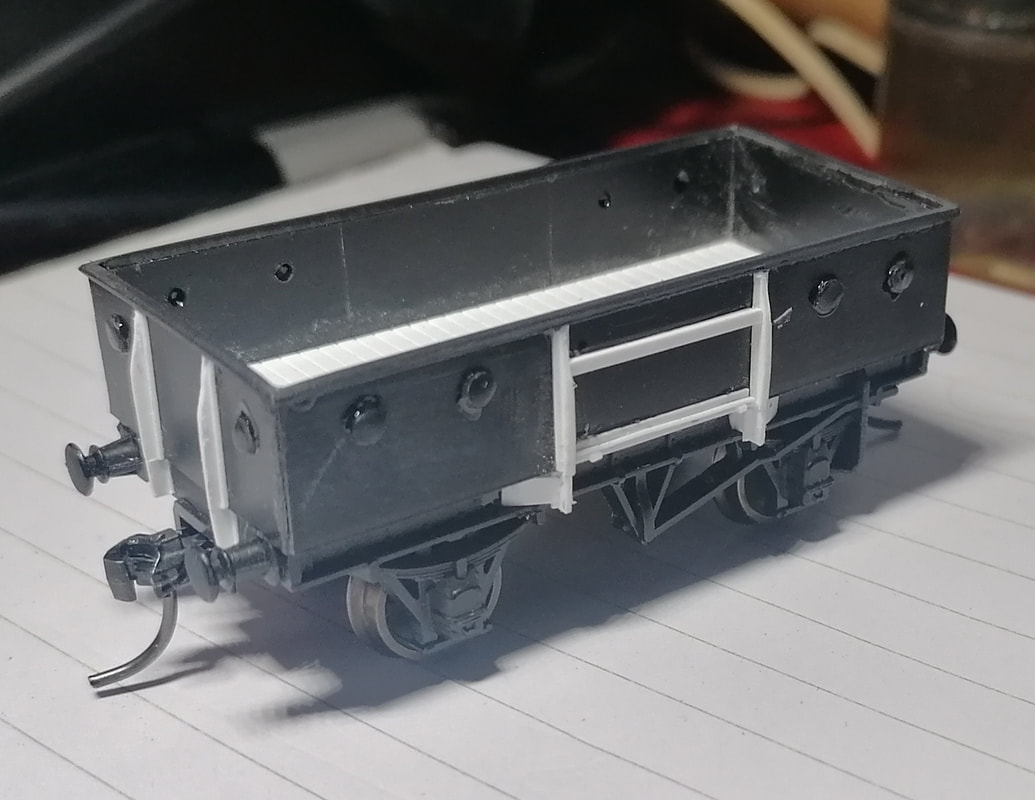
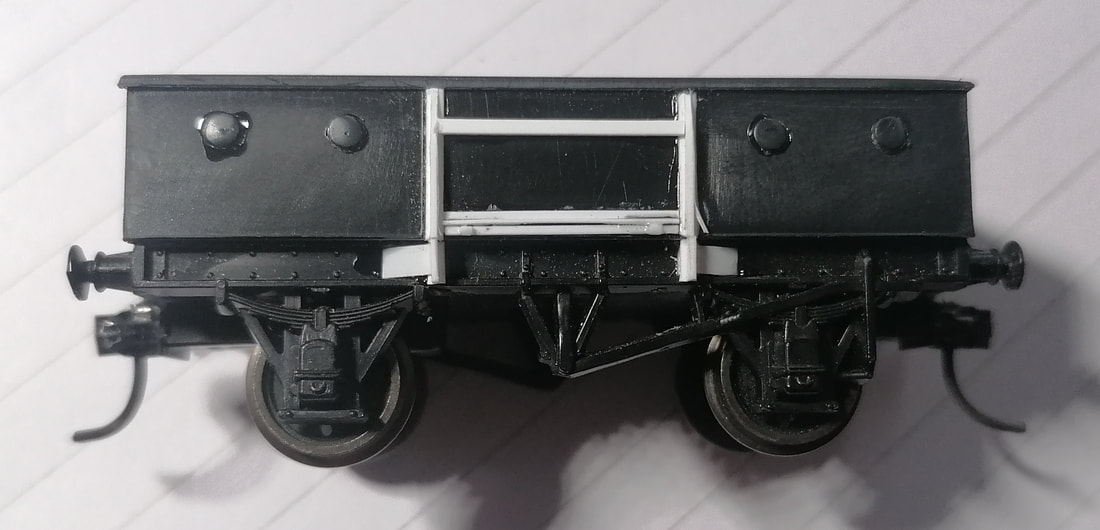
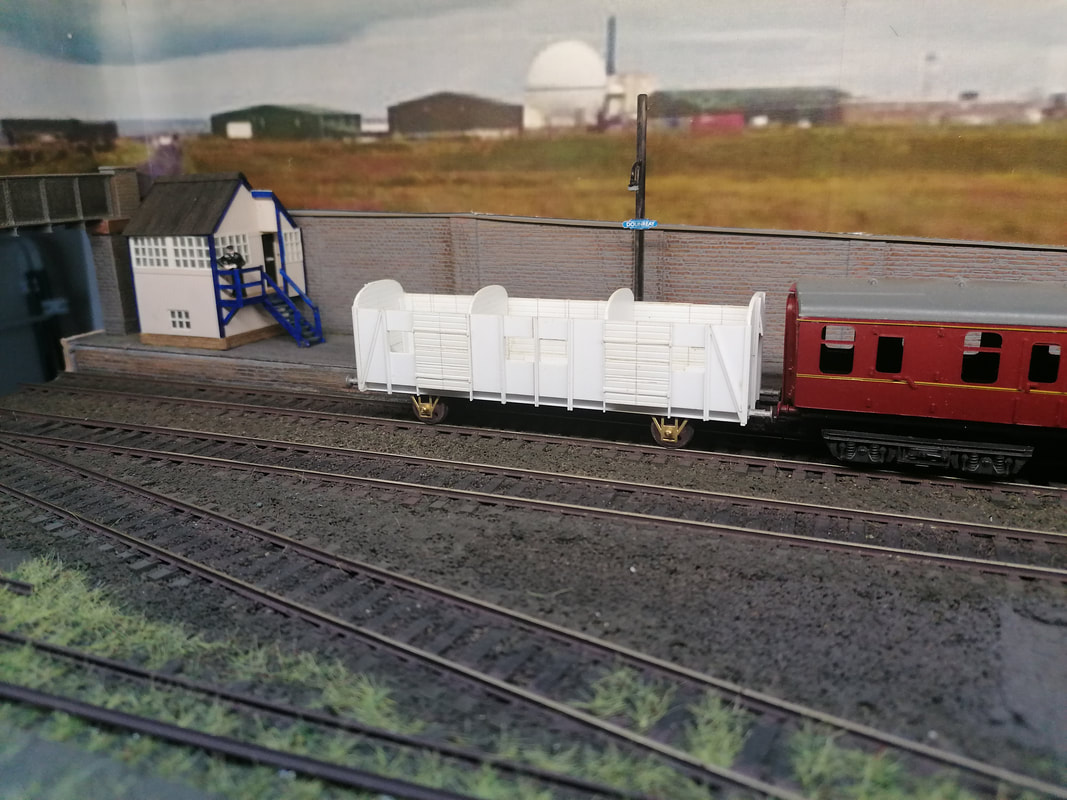
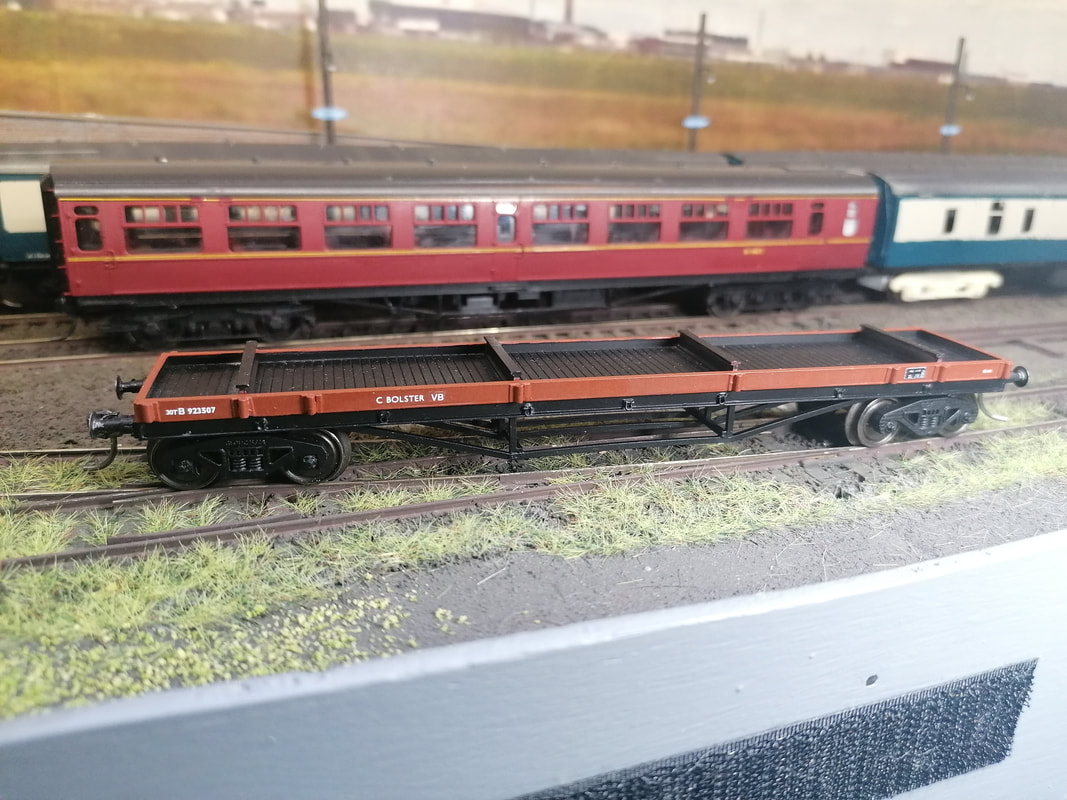
Bogie Bolster C. HO scale.
A scratchbuilt H0 scale Bogie Bolster C is mostly complete. The basic structure (solebars, headstocks, side and end curb rails) are all 3.2mm Evergreen 'C' channel section with the trussing from 1mm square microstrip. The planked floor is Evergreen O gauge 'Passenger Car Siding' with the bolsters 'I'-section plastic, again from Evergreen. The Davis&Lloyd bogies are 3D printed from a friend who kindly scaled up his 2mm scale version. Buffers are from the spares box. Vacuum brake gear still needs fitting and then paint, decals, weathering and a load adding to complete.
7mm Twin Bolster Set.
|
Work in progress on a 7mm Twin Bolster set for eventual use on Cromwell Road Bridge (Club 0 Gauge F/S Layout) as part of a rake of steel carrying wagons (1 each of Bogie Bolster C and E are also awaiting construction)
Most of the later vacuum-braked BR 1/405 Single Bolsters were semi-permanently coupled into pairs under new diagram 1/438, with the inner buffers and couplings replaced by a drawbar and dumb centre coupling. A number of BR steel Lowfits and Conflat As were similarly paired and the fleet of Twin Bolsters ran from the early-60s to the mid-70s. 26t capacity for the pair.
These are J&M Hughes cast resin Single Bolster bodies, ABS Models running and brake gear, Parkside bolsters and a scratchbuilt centre coupling. The model is almost ready to paint, just the 2nd vacuum cylinder and coupling to fit.
A suitable load will be chained down to the bolsters.

|
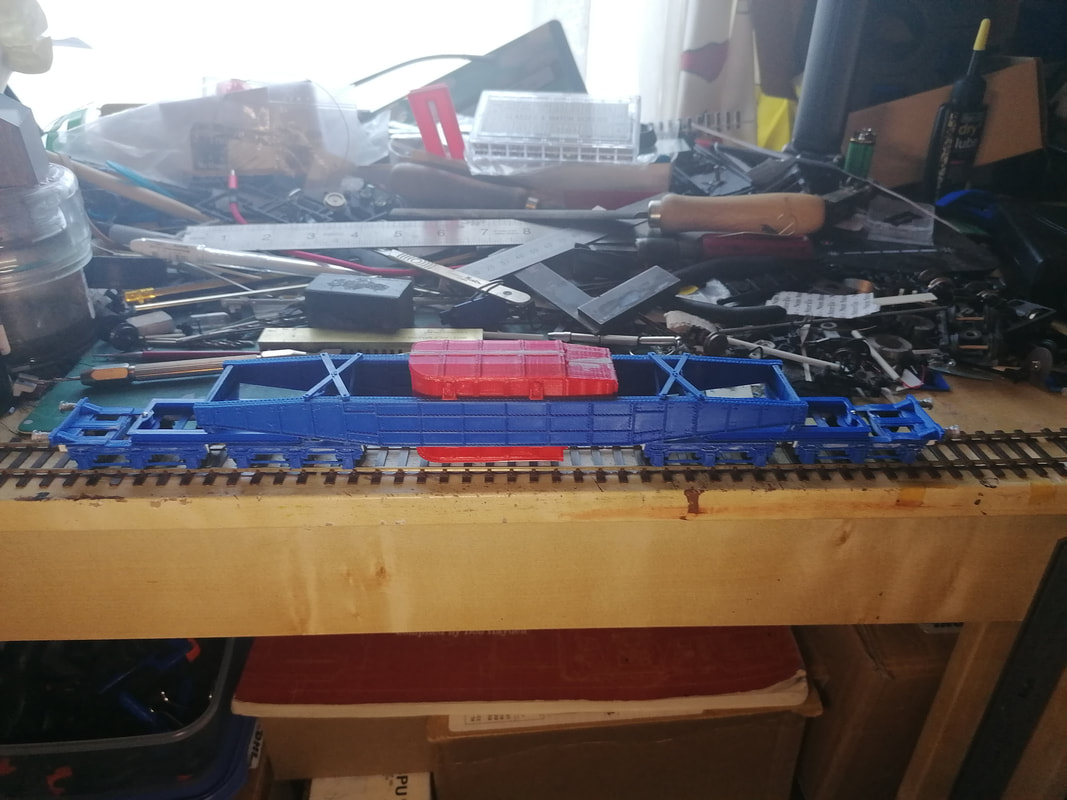
3D Printing an EM gauge Wagon.
|
I recently bought and built a 3D printer kit, the Makertech Axis. Having set it up and tested OK, I found a kind chap on RMWeb had created and shared the files to print a monster wagon... The LMS diag 136A 120ton, 12 axle Transformer wagon.
The files needed some rescaling at the 'slicing' stage to correct some dimensions and I also slightly altered the side girders to strengthen the build.
It took about 20 hours overall to print the various parts, with the 2 halves of the Transformer itself accounting for half that total.
I printed it in Pla filament, 0.12mm layers from a 0.4mm nozzle. The parts were then assembled using superglue.
EM Gauge 10.5mm axles run in 2mm brass bearings, the holes drilled in the bogie sideframes using a simple plasticard jig.
The bogies, span-bolsters and end supports are all bolted together using 1.4mm bolts, washers and nuts.
Having test assembled the wagon and made sure the removable Transformer fits OK, the next stage is to clean, prime and paint the model. It'll be finished in early-1970s condition, grey girders and span-bolsters with black bogies, lettered up as M300000 TRANSFORMER MB.
The model measures 14" (355mm) over buffers!